Author: admin

  • Left on Friday Review: Honest Thoughts and What to Buy

    Left on Friday Review: Honest Thoughts and What to Buy

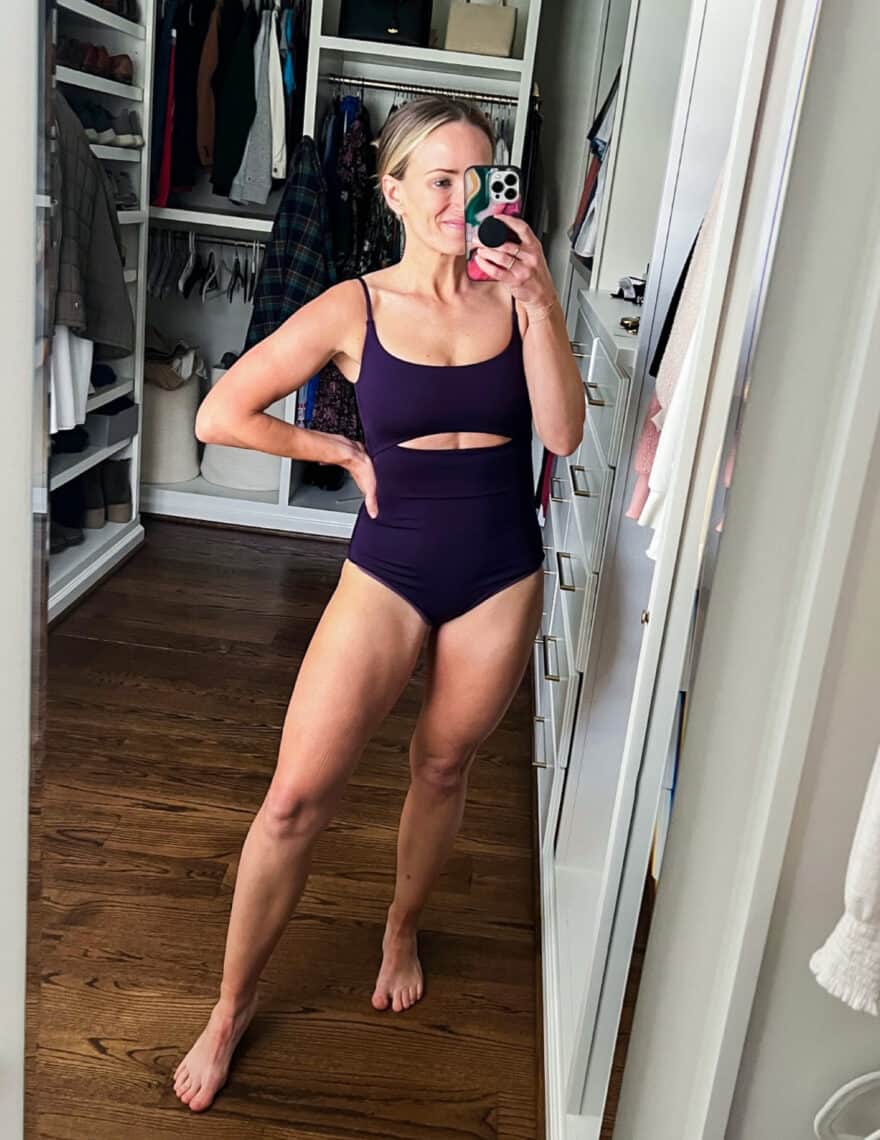
    As a mom to two littles, finding a perfect swimsuit can feel like a never-ending quest. Of course, I want to look cute at the pool, but I need my swimsuit to be functional for swimming and chasing little, too. And at 41 years old, I appreciate decent bottom coverage, don’t want too much cleavage, and want fabric that doesn’t show my c-section scar, so my list of swimsuit must-haves is decently long.

    One of the swimsuit brands I have loved over the last four years is Left on Friday. They make swimwear that feels more like activewear than bathing suits. Their styles are flattering and fitted with great compression, and you can actually run around and swim in them all day. They make a bunch of styles (and they have tons of colors, too), so it’s pretty easy to find a style that you’ll feel cute in all summer. The only catch? It’s pricey. Is Left on Friday worth it? Yes. I’ll explain why I think their swimsuits are totally worth the splurge below.

    If you’re looking for more affordable swimsuits for moms, I have a few linked in this mom-approved swimsuit roundup. I also have a few favorite Amazon swimsuits that are perfect for moms as well. I also tried all the Hunza G dupes to see which ones were worth it!

    Left on Friday Review: Honest Thoughts and What to Buy

    First Impressions: Fabric, Fit & Quality

    One of the first things I noticed about Left on Friday swimwear is the fabric. It’s made from a blend of nylon and spandex that feels buttery-soft yet durable. Their fabric is called Smoothing Dream Fabric, and it’s compressive when wet and dry. It’s snag-resistant (finally, something that doesn’t pill after sitting on the pool deck just once!) and holds up in the sun without fading. I actually took two of their swimsuits to the Turks & Caicos with me last year, and will be bringing them with me again. I find that their swimsuits feel tight but not restrictive – similar to a great pair of leggings.

    Another highlight? The straps. Both the bikini and one-piece stay in place without digging into your shoulders (if you notice them digging, get the tall length!). I also love that the suits come in a variety of coverage levels, so you can choose what works best for you. When I put their swimsuits on for the first time, my immediate impression was that I felt “held in.”

    Colors & Style: What Stood Out

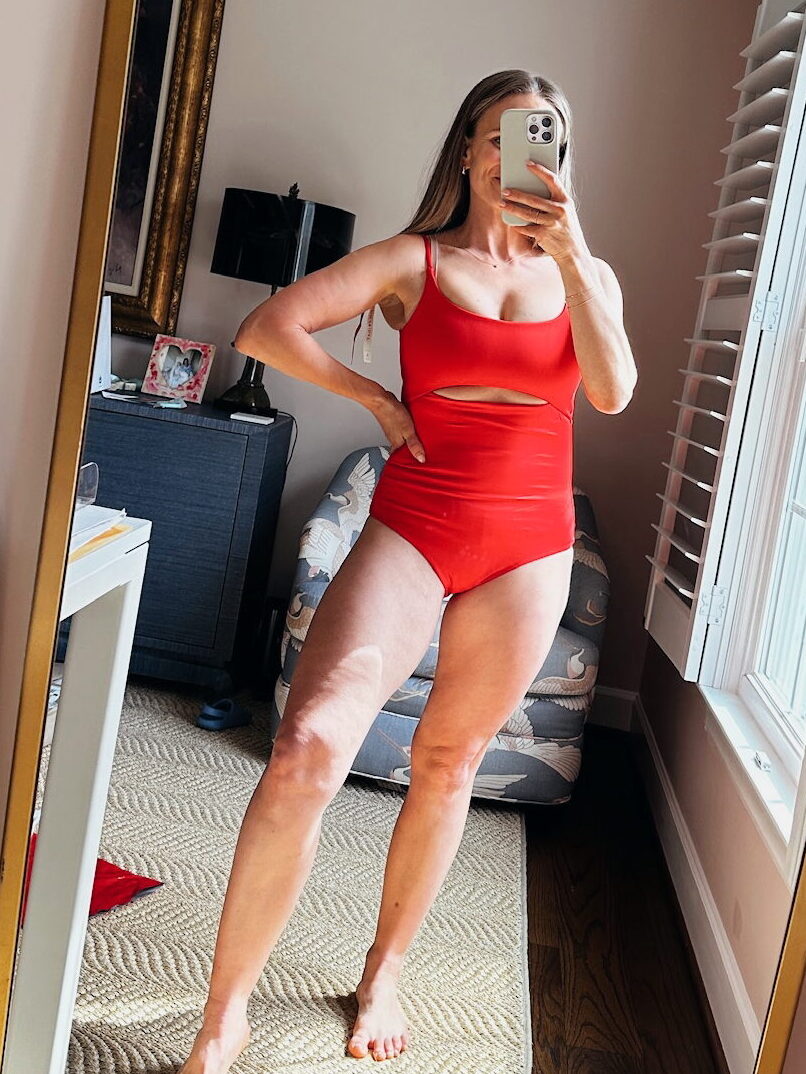
    If you’re a fan of timeless swimwear, Left on Friday has some great options. I personally love the navy pieces because they’re classic and easy to mix and match. They also offer bolder shades if you prefer something brighter (I just ordered a red one-piece). One of the best things about Left on Friday swimwear is that the bikini tops and bottoms are designed to mix and match, making it easy to create different looks with just a few pieces. All of their colors are actually intended to complement each other, so you can buy any of their shades and mix and match your tops and bottoms.

    Variety of Styles & Fit Options

    When I bought my first Left on Friday swimsuit a few years ago (see it in this Dominica trip review), they only had a few styles. Now, they offer tons of options—so whether you’re an A or G cup, they make a top that will work. And the bikini bottoms have all sorts of coverage options, from super high-waisted to low-rise, and from full coverage to thong styles. You can even filter by the rise, chest coverage, and bum coverage you want, making it much easier to find the perfect fit.

    The Price Point – How much does Left on Friday Cost?

    The cost is a significant factor in Left on Friday swimsuits because they aren’t cheap. The pieces range from around $85 for bikini bottoms (you buy bottoms and tops separately) to $180 for a one-piece. At first, this seems steep for a solid-colored swimsuit (I felt this way!). But after wearing Left On Friday for two years, I can confirm that the quality justifies the price. The styles might seem simple, but you just can’t put a price on how good you feel while wearing them. If you’re looking for a long-term swim investment, the price feels more reasonable, primarily since mine have held up perfectly for two years with no issues.

    Sizing: What You Need to Know

    One of the most important things to get right with swimwear is sizing. Left on Friday runs pretty true to size, but because the fabric has a good amount of compression, you might want to size up if you prefer a less snug fit. If you’re in between sizes, consider going with your larger size for comfort, especially in the one-piece swimsuits. The Peak Suit, in particular, runs small, so I’d suggest sizing up. Their one-pieces come in two lengths: regular and tall. The tall is 1.5″ longer – roughly one size longer in length. This means the small tall = the fit of the small, but the length of a medium.

    For D-G cup sizes, the bikini tops designed for high support actually provide solid support, which isn’t always the case with most stylish swim brands. See their fit guide here for more help.

    What to Buy: Best Left on Friday Swimsuits

    Best One-Piece: The Peak Suit

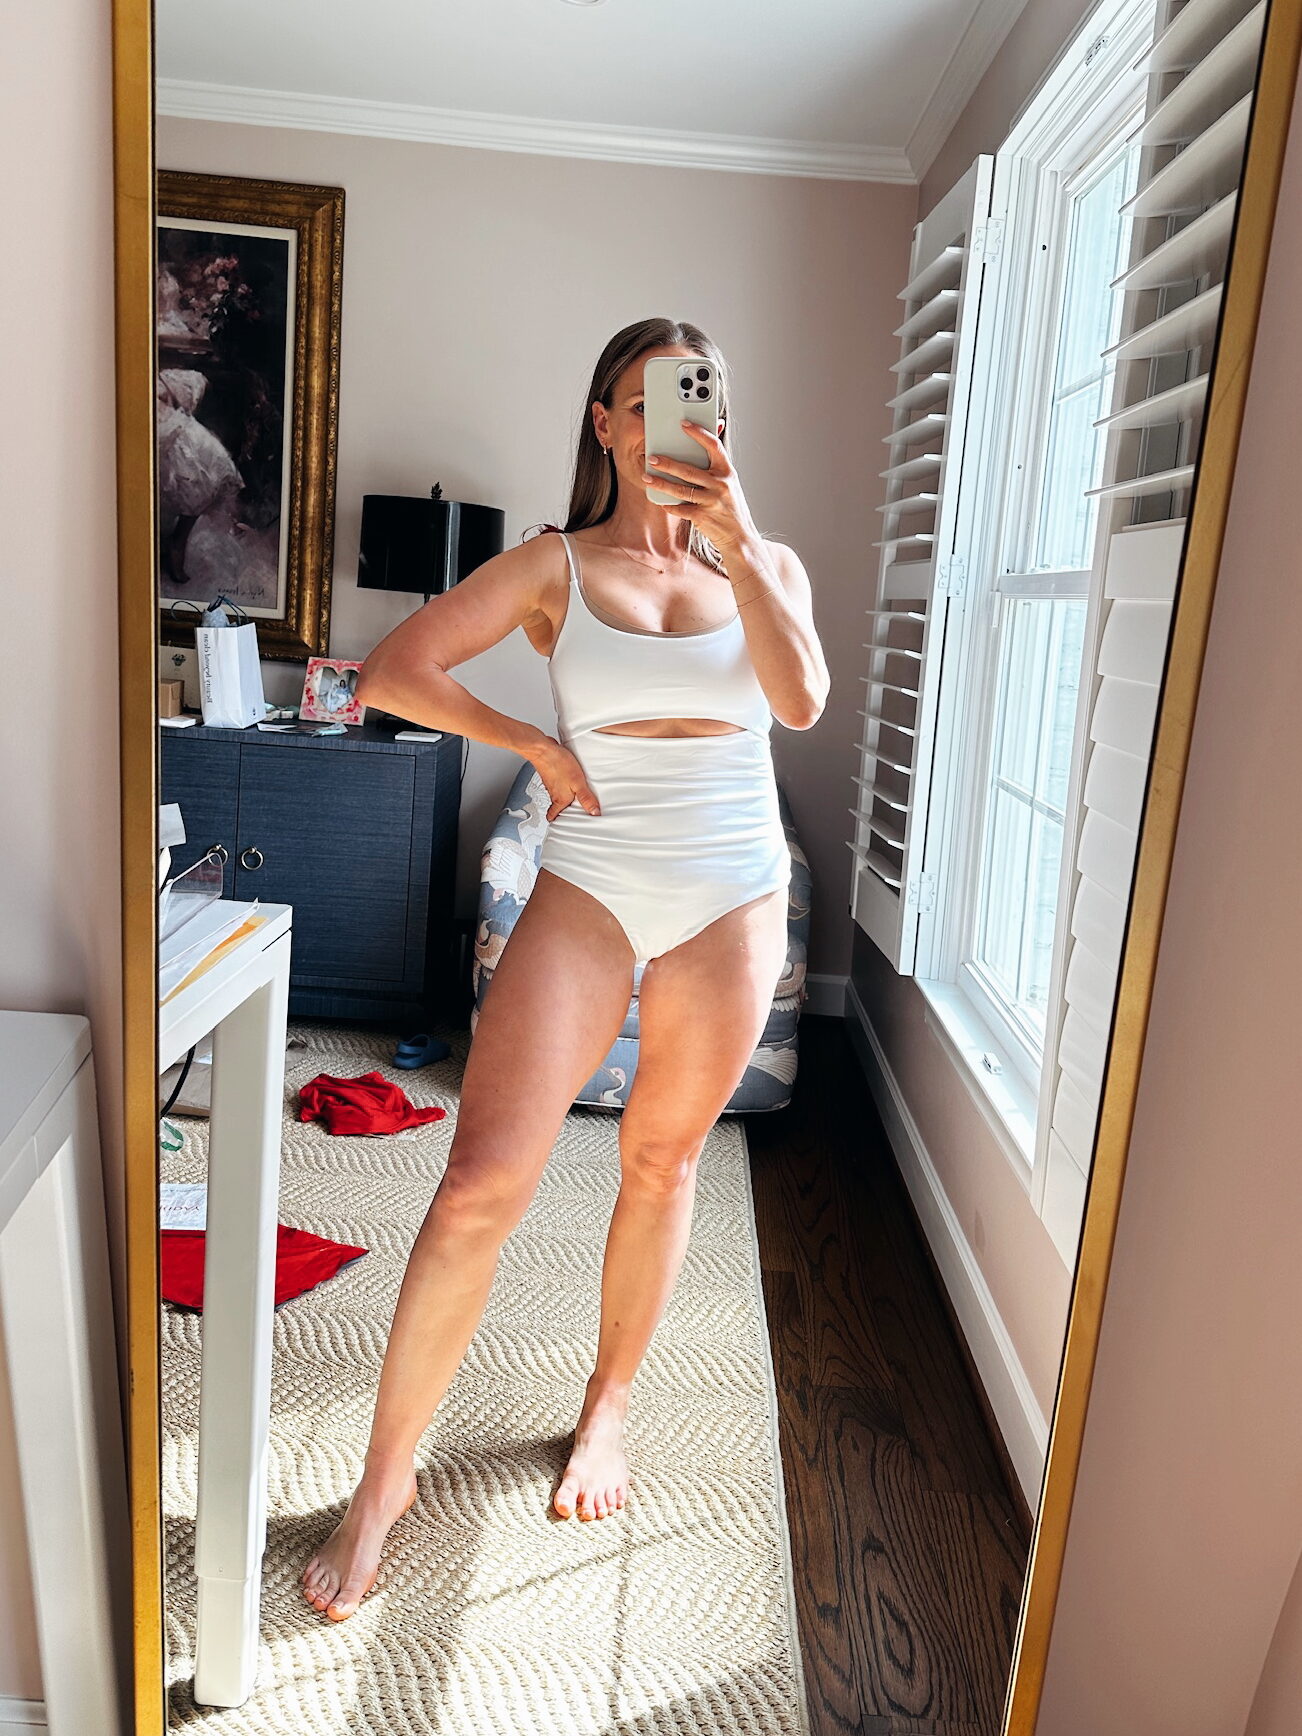
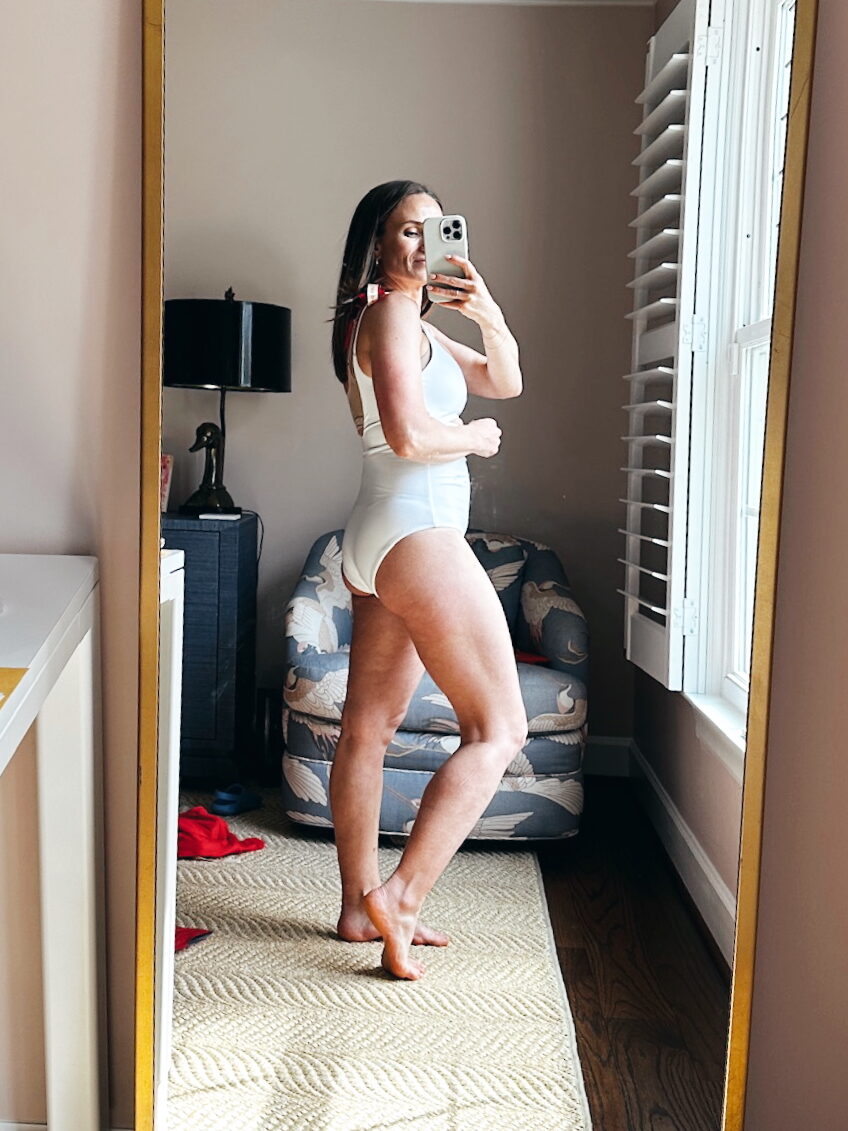
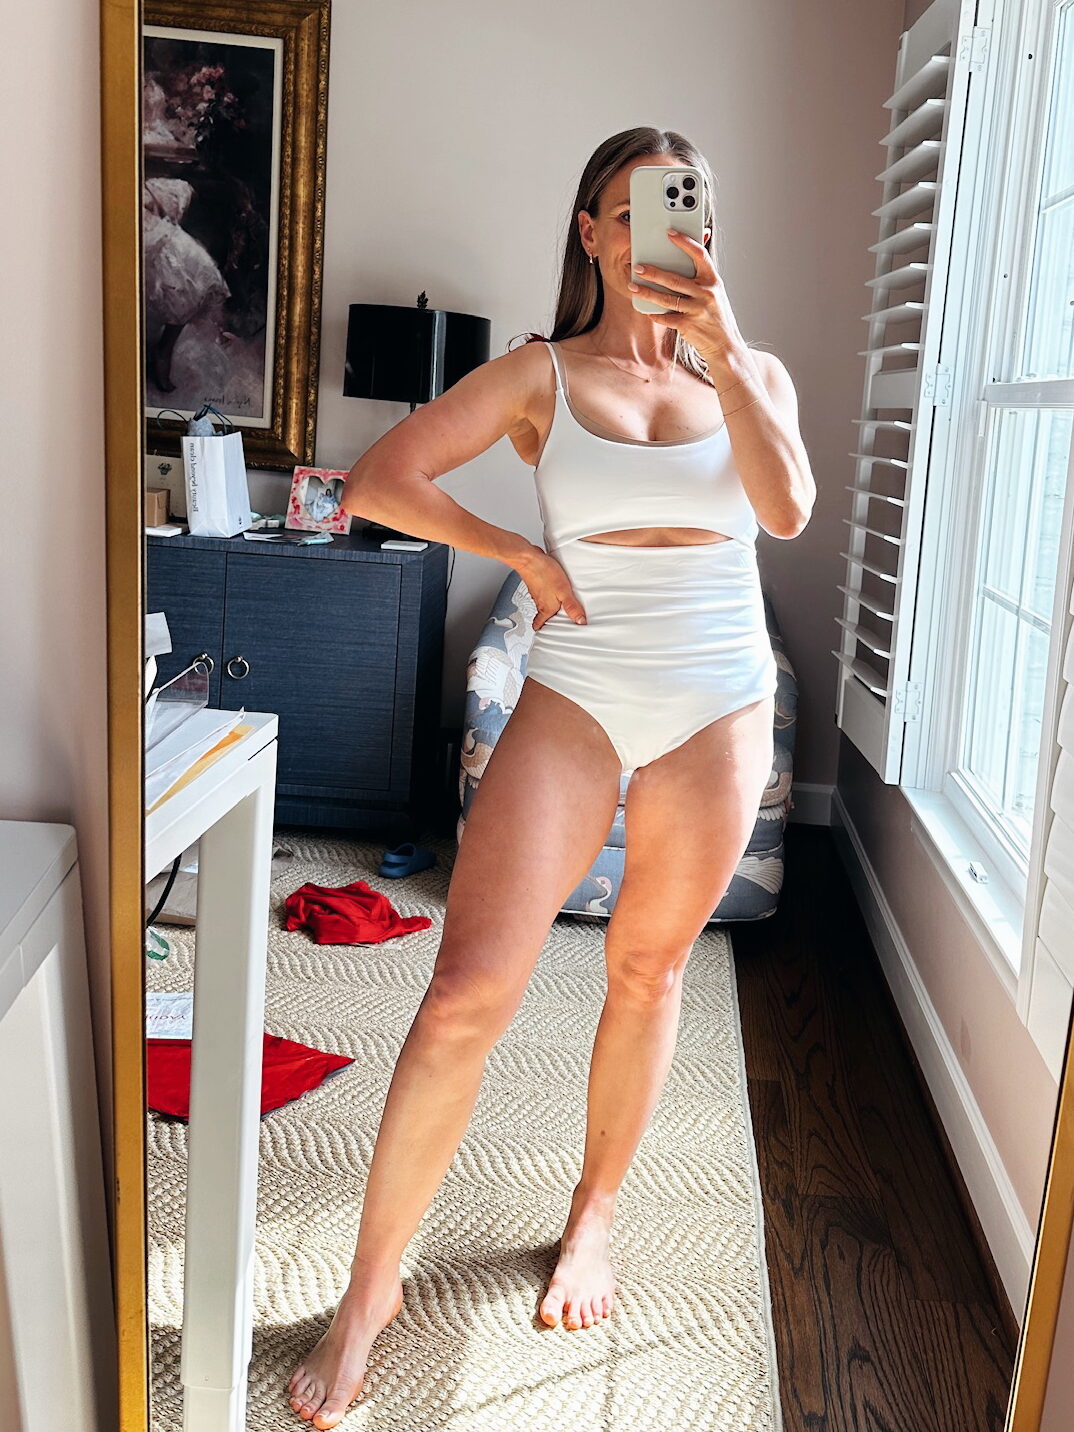
    If you want a one-piece that is both stylish and supportive, the Peak Suit is my top choice. This one piece is super flattering without being too revealing. It has a flattering neckline, a sleek fit throughout, and a cute cutout that gives the appearance of abs (they call this a peek-a-boo), even if you don’t feel like you have abs! In my experience, this one runs small, so I size up to a Medium. It comes in two lengths, so if you have a long torso, I highly recommend the “long” option since it’s 1.5″ longer.

    This suit works for the pool or on vacation, which makes it extra great. I wore it to the Turks last year (and am bringing it with me again this year), and I wear it at the pool with the boys during summer all the time.

    I ordered this swimsuit from Quince to see if it would be a good Left on Friday dupe, and it seemed nice, but ran so small that I couldn’t get it on my body. Based on other swimsuits I’ve tried from there that had some fit challenges, I’d stick with the real thing.

    I shared a try-on video in The Peak Suit here. The second try-on is linked here.


    Turn on your JavaScript to view content

    Great Alternative One-Piece: The Sunday Suit

    If you love a one-piece that offers a great fit without looking frumpy, the Sunday Suit is another must-try. It has just the right amount of coverage while still feeling modern and stylish. The waistline hits at a flattering spot, which makes it a good option if you’re in-between sizes or want a little more shaping. The v-neckline is a great option if you have a larger bust, too! The bum coverage is slightly less than The Peak Suit, but still not super cheeky. This one also comes in two lengths, so consider getting the tall fit if you have a longer torso.


    Turn on your JavaScript to view content

    Best Bikini Top: The Sunday Top

    If you prefer two-pieces over one-piece swimsuits, the Sunday Top is a great option to start with, and this is my favorite bikini top. It’s similar to the Sunday suit one-piece style (v-neck), but just the bikini version. I find that v-neck styles are most flattering on me, but I need to size up for this summer since I’m breastfeeding these days. It’s designed for B-D cups, and it’s their best seller (if you have a larger bust, they make this in a Sunday Top D+ version)! I pair mine with the High-Waist style bottoms (details below).

    I wore this swimsuit on my anniversary trip to Dominica with Tommy and in the Turks & Caicos last year! (See my Dominica post here, and my resort wear packing checklist blog post here.) I’m bringing it on our vacation to the Turks this year, too!


    Turn on your JavaScript to view content

    Best Bikini Bottoms: The Hi-Tide Bottom

    Left on Friday bathing suits are unique because you can mix and match all of their bikini tops and bottoms with each other. I love this because you might like a slightly more revealing top but want a more full-coverage bottom, for example. I love the Hi-Tide bottoms. These are the bottoms that actually made me fall in love with high-waisted styles! I’m petite—5’1″ and muscular—and typically, high-waisted bikinis do not look good on me. They hit in the wrong spot and emphasize the wrong things. But this one is magic. It hits at just the right place, smoothing everything out while still feeling trendy. I recommend sizing up for the most comfortable fit if you’re in between sizes. You can see these bottoms in the photos above!


    Turn on your JavaScript to view content

    Best for Active Swimmers: Top Shelf

    If you spend more time in the water than lounging poolside, the Top Shelf bikini top is a good option. It has good bust coverage and support, so it will stay in place whether you’re swimming, surfing, or playing with your kids in the water. No awkward adjustments required! Pair this top with whichever bottoms suit your fancy. The Streamline Top is similar but for smaller busts, if that’s you.


    Turn on your JavaScript to view content

    Left on Friday Activewear

    While I purchased my swimsuits on my own, I was gifted some Left on Friday workout apparel—and I absolutely love it. The pieces have the same buttery soft fabric as their swimwear, and they are insanely flattering. They hold up so well for workouts and athleisure. Definitely worth adding to cart while you’re shopping!

    This would be a great set to wear to Pilates. See the rest of my Pilates outfit ideas in this post.


    Turn on your JavaScript to view content

    Final Verdict: Should You Buy Left on Friday Swimwear?

    If you want a swimsuit that’s well-made, has high compression, and doesn’t look frumpy at the pool when you’re swimming with your kids, yes, Left on Friday is worth the splurge. The price is on the higher end, but the durability and fit justify it.

    Who It’s Best For:

    • People who want high-quality, long-lasting swimwear
    • Those looking for activewear-style swimsuits that stay put
    • Anyone who prefers sleek, minimalist designs over trendy prints

    Who Might Skip It:

    • Anyone looking for budget swimwear under $50
    • Those who prefer ultra-trendy or heavily detailed swimsuits

    Overall, I’d recommend trying at least one piece—especially if you’re tired of swimsuits that don’t last. Left on Friday definitely delivers on its promise of chic, functional, and flattering swimwear. Would I order again? Yes! Next on my list is trying more of their one-piece swimsuits and high-waist styles.

    Shop The Post


    Turn on your JavaScript to view content

    The post Left on Friday Review: Honest Thoughts and What to Buy appeared first on TeriLyn Adams.

  • How to Freeze Green Beans Without Losing Flavor or Texture

    How to Freeze Green Beans Without Losing Flavor or Texture

    How to Freeze Green Beans Without Losing Flavor or Texture

    When I need a quick, reliable side dish for a family dinner, green beans are one of my go-tos. This is especially true when I make my easy green bean recipe! They’re simple, nutritious, and always a crowd-pleaser. The only downside? Fresh green beans aren’t available year-round.

    You’ll usually find the best green beans from June through September, whether that’s at the grocery store, your local farmer’s market, or even your own backyard garden. This is when they’re at their freshest and most affordable. So when I end up with a big pile of beautiful green beans on my counter, the last thing I want to do is let them go to waste.

    That’s where freezing comes in. I love freezing fresh green beans so I can enjoy them all year long without sacrificing flavor, color, or nutrients. And the best part is, it’s way easier than you might think.

    I’m sharing my simple, step-by-step method for freezing green beans the right way. The process keeps them crisp, vibrant, and delicious, so they’re ready whenever you need a quick veggie side. Let’s get freezing!

    How to Freeze Green Beans Without Losing Flavor or Texture

    How to Freeze Green Beans Without Losing Flavor or Texture

    Fresh green beans don’t last very long. They usually stay good for about a week in the fridge or a couple of days at room temperature. And honestly, it feels like such a waste to toss those bright green beauties in the trash. That’s why I love practicing a little food preservation and freezing it for later.

    And here’s the good news: freezing green beans doesn’t ruin them. When you do it right, their texture, color, and nutritional value stay intact. It’s one of the easiest ways to stretch your groceries, reduce food waste, and keep healthy ingredients on hand year-round.

    That’s exactly why I’m dedicating this post to showing you how to freeze green beans. I’ll also walk you through why they’re so good for you and share my best tips for getting the tastiest green beans after freezing. 

    Are Frozen Green Beans Good for You?

    Yes, frozen green beans are absolutely good for you. And in many cases, they’re just as nutritious as fresh ones (sometimes even more so!). When green beans are frozen properly, they keep most of their vitamins, minerals, and fiber thanks to a quick step called blanching. Don’t worry; I’ll walk you through exactly how to do that at home in a bit.

    Here are a few of my favorite nutrients green beans bring to the table:

    • Vitamins and Minerals: Frozen green beans hold onto key nutrients, including vitamin C, vitamin A, vitamin K, folate, and minerals such as potassium and magnesium.
    • Fiber: Freezing doesn’t affect fiber at all. This means frozen green beans are still great for digestion and helping keep blood sugar balanced.
    • Antioxidants: Those antioxidants responsible for green beans’ health benefits—and their bright green color—hold up beautifully in the freezer.

    So, if you’re worried that freezing your green beans reduces their nutritional value, now you know! They’re nearly just as healthy as fresh ones, with the bonus of no looming expiration date.

    Are Frozen Green Beans Better Than Canned?

    Yes, frozen green beans are almost always a better choice than canned. They keep their texture, flavor, and nutrients so much better. Plus, they’re frozen quickly after harvesting without preservatives or extra ingredients, which is a big win in my book.

    If you’ve ever opened a can of green beans, you know what I mean. They’re usually soft, kind of mushy, and dull in color. And if you flip over the nutrition label, you’ll find a lot of added sodium—which is totally unnecessary, in my opinion. That happens because canned green beans are cooked at a very high heat for a long time. This process causes them to lose key vitamins, like vitamin C and B. 

    Honestly, you’ll never find canned green beans in my pantry. I just can’t get past the floppy texture or all the added salt. My girls feel the same way. They want nothing to do with a limp green bean! That’s exactly why frozen green beans are our go-to veggie.

    Bottom line: frozen green beans win when it comes to nutrition, flavor, and texture—no contest. 

    Can You Freeze Fresh Green Beans?

    You can totally freeze green beans at home. But there’s a little more to it than tossing fresh beans into a freezer bag and calling it a day. If you want your green beans to keep that bright green color, crisp crunch, and all their nutrients, blanching beans before freezing is key. This step is non-negotiable and makes all the difference.

    Below, I’m walking you through my simple method for freezing green beans the right way. It’s easy, budget-friendly, and such a smart move for both your health and your grocery bill. 

    How Do You Freeze Green Beans

    How Do You Freeze Green Beans?

    Step 1: Sort, Wash, and Trim

    Start by spreading out all your green beans and giving them a quick once-over. You’re looking for bright-green beans that are both firm and smooth. If any are limp or spotty, either toss them or use them right away. 

    Once you’ve picked the good ones, rinse the beans under cool water in a colander. Pat dry, then trim off the stem ends and tails if you’d like. You can leave them whole or cut them into bite-sized pieces—whatever works best for how you plan to use them later. 

    Step 2: Blanch

    Next, bring a large pot of water to a rolling boil. While the water heats up, fill a large bowl with cold water and plenty of ice. Trust me on this one: you’ll want your ice bath ready to go before the green beans hit the boiling water.

    Once the water is boiling, carefully add the green beans. Blanch green beans for 2 minutes if they’re small or chopped, and 3 minutes if they’re whole and larger. Be sure not to overcook them—you’re just giving them a quick dip.

    As soon as the timer goes off, use a strainer or slotted spoon to transfer the beans straight into the ice bath. This stops the cooking immediately and helps lock in that bright green color and nutrients. Let the beans sit in the ice bath for the same amount of time they were in the boiling water. 

    Step 3: Dry and Flash Freeze

    Once the green beans are done chilling, drain them from the ice bath and pat them completely dry with a clean towel. You can also use a salad spinner if you have one—it works great here. The key is removing as much moisture as possible to prevent ice crystals and freezer burn later on.

    Next, spread the green beans out in a single layer on a baking sheet. Pop the tray into the freezer and let them flash freeze for 1-2 hours. This extra step is so worth it. It keeps the beans from freezing together into one big green bean block! Plus, it makes them especially easy to grab by the handful later. 

    Step 4: Pack and Seal

    Once the green beans are firmly frozen, transfer them to a freezer-safe bag or container. I like to portion them into “dinner-size” amounts. This lets me grab exactly what I need without thawing the whole batch. Flat freezer bags are my favorite because they stack neatly and save so much precious freezer space.

    Don’t forget to label each bag with the date! While frozen green beans don’t technically go bad, you’ll get the best flavor and texture if you use them within 8-12 months. 

    How to Prepare Green Beans for Freezing

    How to Prepare Green Beans for Freezing

    Choose your green beans carefully.

    If you’re taking the time to freeze green beans, you want to make sure you’re starting with the good stuff. Spend a few minutes sorting through your beans and choosing the best ones for freezing. Look for beans that are firm, crisp, and bright green—those will freeze beautifully.

    If any beans feel limp, look spotty, or have dark marks, set them aside. Those are better used right away or tossed. Starting with fresh, high-quality beans makes all the difference when you pull them out of the freezer later. 

    Trim and cut the green beans.

    Taking a few extra minutes to trim those tough, woody ends off your green beans before freezing is so worth it. It makes cooking later a breeze—and saves you from biting into a hard, chewy piece at dinnertime (no thank you). 

    If you choose to cut your green beans into smaller pieces, that helps them blanch and freeze more evenly, too. The result? Better texture, more even cooking, and green beans that taste just as good when you pull them out of the freezer months later.

    Frequently Asked Questions About Freezing Green Beans

    Can you freeze cooked green beans?

    Yes, you can freeze cooked green beans! Just know that they’ll be a fit softer once thawed. For the best texture, slightly undercook them before freezing so they don’t turn mushy later.

    How long to blanch green beans for freezing?

    Blanch green beans for 2-3 minutes, depending on their size. As soon as the timer goes off, transfer them straight into an ice bath to stop the cooking.

    Can you freeze green beans without blanching?

    You can, but I don’t recommend it. Skipping blanching often leads to dull color, off flavors, and a softer texture over time. Blanching really makes a huge difference. 

    Can you freeze canned green beans?

    Technically, yes, but it’s not ideal. Canned green beans are already very soft, so freezing and thawing them usually makes them even mushier.

    How to freeze fresh garden green beans?

    Start by washing and trimming them. Blanch for 2-3 minutes, cool them in an ice bath, dry them well, then freeze in airtight containers or freezer bags.

    How long can you freeze green beans?

    For the best flavor and texture, use frozen green beans within 8-12 months. They’re still safe to eat beyond that, but quality may start to decline.

    Can you freeze green beans before canning?

    Yes, you can freeze them first if needed. But for the best texture and quality, it’s always a good idea to can green beans while they’re fresh.

    Freezing your fresh green beans is a healthy and delicious way to prevent food waste and lower your grocery bill.

    When it comes to food preservation, I’m all in on getting the most out of our groceries. (Even better when it’s something we’ve grown ourselves!) One of my favorite ways to do that is by freezing fresh fruits and veggies, especially green beans.

    Any time I spot fresh produce on sale or bring home a big haul from the farmer’s market, I prep what I can and tuck it into the freezer. That way, nothing goes to waste, and I always have healthy ingredients ready to go. It’s such a simple habit, but it makes a big difference.

    So next time you see beautiful, bright green beans at the market, grab a bunch and freeze them for later. You’ll be so glad you did!
    And if you’re ready to freeze even more fresh ingredients, be sure to check out my posts “How to Freeze Fresh Blueberries” and “How to Freeze Cauliflower Rice” next.

  • How to Buy and Sell Vintage Furniture on Facebook Marketplace

    How to Buy and Sell Vintage Furniture on Facebook Marketplace

    This post was sponsored by Facebook Marketplace. Opinions and vintage obsessions are entirely our own.


    If you have ever walked into a flea market and felt your heart race at the sight of a chippy painted table or a perfectly worn mid-century chair, you already get it. The hunt is half the fun. But what if you could do that hunt from your couch, in your pajamas, at midnight? That is exactly what Facebook Marketplace has become for me, and it has changed how I shop for my home entirely.

    What You Will Learn in This Post

    1. Why Facebook Marketplace is a gold mine for vintage home decor
    2. How to search for vintage furniture and unique finds like a pro
    3. How to contact a seller and negotiate a better price
    4. What to inspect before you hand over cash
    5. How to style a vintage find in your home
    6. How to sell your clutter on Facebook Marketplace for cash
    7. Safety tips for smart, confident buying

    Pro Tip: Items move fast. If you see something you love, message the seller right away. Hesitate and it is gone.

    Why Facebook Marketplace Is a Gold Mine for Vintage Home Decor

    I will be honest. I was skeptical at first. I am a flea market girl. I love the smell of old wood and the thrill of digging through someone’s grandmother’s china collection. But Facebook Marketplace has surprised me with the quality and variety of what is out there. We are talking real vintage furniture, antique lighting, farmhouse decor, mid-century modern pieces, and quirky one-of-a-kind finds that you simply cannot get from a big box store or even most antique shops.

    The difference is that you are buying directly from local people. No middleman markup. No shipping damage. And often, sellers are just happy to see their beloved piece go to someone who appreciates it.

    Love decorating on a budget? Check out our guide on budget decorating ideas and how to decorate your home with art for more inspiration.
    1

    How to Search Facebook Marketplace Like a Pro

    Head to facebook.com/marketplace or tap the Marketplace icon in your Facebook app. The search bar is your best friend here. Be specific but also think like a seller. They may not know the exact era or style name of what they are selling, so casting a wider keyword net helps.

    Search terms that get results for vintage home decor:

    • Farmhouse table, chippy table, enamel table
    • Mid-century chair, danish modern, vintage lamp
    • Antique dresser, hutch, buffet, sideboard
    • Vintage decor, old sign, cast iron, milk glass
    • Estate sale items, moving sale, downsizing

    Use the filters to narrow by location, price range, and category. Set a reasonable radius. I usually start at 25 miles and expand from there if needed. Sorting by newest listings lets you catch fresh posts before anyone else does.

    Save listings you love by clicking the bookmark icon, but do not sit on them too long. Popular items disappear fast.

    2

    How to Contact a Seller and Negotiate a Better Price

    Found something you love? Click the listing and hit the message button to reach out. Facebook will send an opening message to the seller asking if the item is still available. From there you can ask questions, request more photos, or make an offer.

    Tips for negotiating without being awkward about it:

    • Be friendly and show real enthusiasm. Sellers are more likely to work with someone who seems excited about the piece
    • Ask about the item’s history. People love sharing the story behind something they have owned for years
    • If the price feels high, make a reasonable counteroffer. Most sellers expect a little back and forth
    • Avoid lowballing aggressively. It is off-putting and can lose you the deal entirely
    • Mention that you can pick up quickly. Sellers appreciate a buyer who will not flake

    When I found my vintage enamel baking table listed for $85, I asked a couple of questions, showed real enthusiasm for the piece, and we landed on $75 at pickup. The whole exchange took about ten minutes and felt completely natural.

    3

    What to Inspect Before You Hand Over Cash

    Once you have agreed on a price, set up a time and place to meet. Always inspect the item in person before paying. Here is what to check:

    • Structural integrity: Wobble the piece, check joints, test the legs
    • Surface condition: Scratches and wear add character. Cracks and water damage are deal-breakers
    • Smell: Musty or smoky odors can be very difficult to remove from wood and upholstery
    • Dimensions: Always measure before you go so you know the piece fits your space and your car

    My enamel table had a near-perfect top and beautifully worn chippy legs, exactly what I was hoping for. We met the next day, I handed over $75 cash, and that sweet little table rode home in the back seat.

    Planning a bigger home refresh? Our guest room makeover and master bedroom makeover guides are full of ideas for styling found pieces into a cohesive look.
    4

    How We Styled Our Vintage Enamel Baking Table

    This is the fun part. Driving home I was already mentally rotating this table through every room in the house. Kitchen prep table? Vanity? Desk? It could work as all three. For now it landed as a reading desk and it looks like it was always meant to be there.


    Vintage circa 1940s enamel topped baking table with chippy farmhouse legs found on Facebook Marketplace for $75Vintage circa 1940s enamel topped baking table with chippy farmhouse legs found on Facebook Marketplace for $75
    The vintage enamel baking table as found. Circa 1940s, chippy legs, near-perfect enamel top. $75 on Facebook Marketplace.


    Vintage farmhouse enamel table before styling, placed as a reading desk in a homeVintage farmhouse enamel table before styling, placed as a reading desk in a home
    Before styling. The table in its new spot, already looking at home.


    Chippy vintage white cream farmhouse enamel baking table styled as reading desk with chair and accessoriesChippy vintage white cream farmhouse enamel baking table styled as reading desk with chair and accessories
    After styling with a gifted chair and accessories we already owned. Total spend: $75.


    The legs are chippy and worn in that perfect way that no one can fake or mass produce. The enamel top is smooth, cleanable, and completely functional. It is the kind of piece that makes people ask where you got it, and the answer is always more satisfying when it comes with a story.

    Want more styling inspiration? See how we approach blending modern and traditional decor for a cohesive look when mixing vintage pieces with newer ones, and browse our favorite ways to spruce up your home with fabric for easy finishing touches.
    5

    What Else Can You Find on Facebook Marketplace?

    Vintage furniture is just the beginning. Facebook Marketplace has become a surprisingly deep well for all kinds of home-related finds. Here is a taste of what turns up regularly:

    • Furniture: Sofas, dining sets, dressers, beds, bookcases, outdoor furniture
    • Decor: Artwork, mirrors, rugs, lighting, plants and planters
    • Kitchen: Appliances, cookware sets, vintage dishware and glassware
    • Renovation materials: Lumber, tiles, paint, fixtures, and hardware. A fantastic resource for home upgrades on a budget
    • Everything else: Electronics, clothing, toys, sporting goods, and more

    You can also find listings for cars, rentals, and local services. It has become a genuine one-stop local marketplace that keeps getting bigger and more useful.


    Styled vintage farmhouse reading nook with enamel table and chair found and giftedStyled vintage farmhouse reading nook with enamel table and chair found and gifted
    The finished reading nook. Styled entirely with found, gifted, and already-owned pieces.

    6

    How to Sell Your Clutter on Facebook Marketplace for Cash

    Here is the part that makes Facebook Marketplace a genuine lifestyle tool rather than just a shopping app. You can sell, too. That closet full of things you never reach for? The furniture that does not fit your new place? List it and get paid.

    How to list an item in under five minutes:

    1. Snap 3 to 5 clear photos in good natural light
    2. Write a short, honest description including condition, dimensions, and any flaws
    3. Set your price. Check similar listings first to price competitively
    4. Choose your pickup preference: home pickup or a public meeting spot
    5. Post it. There are no listing fees

    Payment is handled between you and the buyer, so cash on pickup is the simplest option for local transactions. The whole process is refreshingly straightforward.

    Moving soon? Facebook Marketplace is one of the best ways to clear out before a move. Pair it with our full decluttering before a move guide and our packing and unpacking tips for a smooth transition.
    7

    Safety Tips for Smart, Confident Buying

    Facebook Marketplace is generally safe and straightforward, but a few smart habits go a long way:

    • Meet in public for small items. A parking lot, coffee shop, or police station safe exchange zone all work well
    • Bring a friend for larger furniture pickups at someone’s home
    • Check the seller’s profile and look for reviews, mutual friends, and how long they have been on Facebook
    • Never pay in advance via wire transfer or gift cards. Cash on pickup only for local deals
    • Trust your instincts. If something feels off about a listing or a seller, move on
    • Measure twice. Confirm dimensions before you drive across town

    The vast majority of transactions are completely smooth and even enjoyable. I have met some wonderfully interesting people through Marketplace pickups, neighbors I never would have crossed paths with otherwise.


    Closeup of chippy vintage 1940s farmhouse white enamel baking table legs showing natural patina and wearCloseup of chippy vintage 1940s farmhouse white enamel baking table legs showing natural patina and wear
    The chippy leg detail up close. This kind of patina simply cannot be replicated. Worth every dollar of that $75.

    The Verdict: Facebook Marketplace for Home Decor Is the Real Deal

    What started as a single sponsored search for a vintage piece turned into a completely new way of thinking about how I shop for and style my home. The combination of unique local finds, prices that actually make sense, and the satisfaction of rescuing something beautiful from someone’s garage makes this the most fun I have had decorating in years.

    Whether you are furnishing a first apartment, refreshing a tired room, hunting for farmhouse antiques, or just trying to clear out your attic for cash, Facebook Marketplace consistently delivers. The inventory changes daily, the deals are real, and the stories that come with each piece are something no retail store can offer.

    Mark me as sold. Completely and permanently sold.

    Ready to keep the momentum going? Browse our tips for creating a more organized and comfortable living space, get ideas from our spring cleaning guide for freshening up before you bring new pieces in, and see how we pull a room together in our clutter-free home environment guide.

    The post How to Buy and Sell Vintage Furniture on Facebook Marketplace appeared first on Better Living.

  • Modern Sound Therapy

    Modern Sound Therapy

    Moving from niche wellness into the mainstream.

    Modern sound therapy has been increasing in popularity and become a mainstream wellness practice due to a growing demand for non-invasive, holistic, and stress-reducing interventions.

    Techniques include sound baths, tuning forks, and binaural beats to combat anxiety and burnout.  Around 58% of wellness centers in the U.S. offer some form of sound therapy, with increasing collaboration with yoga centers and corporate wellness programs. Research has shown that specific types of music and sound frequencies may help reduce anxiety, lower heart rate, improve sleep quality, and even reduce the perception of pain.

    Sound therapy is the use of sound frequencies, rhythms, and vibrations to influence the body and mind.  The simple principle is that everything vibrates and operates at specific frequencies.  Brainwaves, emotions, human organs all do, and when they fall out of balance due to trauma, stress or illness, sound can be used as a tool to guide the system back into harmony.  It makes sense to me.

    Sound-based healing practices have existed for thousands of years in many cultures.  There have been Tibetan has singing bowls, Aboriginal didgeridoos, and Vedic chanting.  Modern sound therapy integrates those traditions with modern scientific knowledge and technology.

    Contemporary sound therapy uses neuroscience, psychology, and physics.  These disciplines have produced brainwave entertainment, the process by which external rhythmic stimuli influence brainwave patterns.  Another is resonance, where certain sound frequencies can stimulate the vagus nerve, calm the nervous system, and promote parasympathetic (rest & digestion) activity. Many people say they feel calmer, clearer, and more emotionally balanced after sound therapy sessions. Because sound bypasses analytical thinking and works directly with the nervous system, it can be very effective for people who struggle with traditional talk-based therapies.

    Here are some of the options:


    Singing bowls and gongs: Used in sound baths, these instruments produce rich overtones that wash over the listener, encouraging deep relaxation.


    • Tuning forks: Calibrated to specific frequencies, tuning forks may be applied near or on the body to target tension or energetic blockages.
    • Binaural beats: Delivered through headphones, binaural beats use slightly different frequencies in each ear to influence brainwave states.
    • Vocal toning and chanting: The human voice is one of the most powerful sound healing tools, using sustained vowels or mantras to stimulate resonance within the body.
    • Frequency-based audio tracks: Modern apps and wellness platforms offer curated soundscapes designed for sleep, focus, meditation, or emotional release. See below for a recommendation for one on You Tube.

    Many well-known celebrities have been raving about having sound therapy as part of their self-care routines.  Katy Perry, Adele, Russell Brand, Reese Witherspoon, and Ben Folds have all shared their beneficial use of sound therapy to improve their mental health and manage stress.

    Sound therapy is not only available from specialized practitioners.  It has entered everyday life through meditation apps, sleep playlists, noise machines, and wellness technology.  Even DIY practices like humming, listening to calming music, or walking in a scenic area, can be considered forms of sound therapy.  Intentional sound therapy is about awareness and active listening to notice how the sounds affect breath, body sensations and emotional state.

    I have tried Zac’s Stress Relief Music on You Tube and liked many of the options.

    I searched reviews of other top-rated sound therapy apps and here the top results:

    A concern –

    Some studies lack strong empirical support; therefore, sound therapy should not replace any medical treatment.  Sound therapy should be viewed as complementary to other wellness practices. It is a low-risk, accessible tool for relaxation and stress management.


    The post Modern Sound Therapy appeared first on Sharp Eye.

  • Cottage Cheese Alfredo Pasta (High-Protein & 30 Minutes)

    Cottage Cheese Alfredo Pasta (High-Protein & 30 Minutes)

    If you love creamy Alfredo pasta but don’t love how heavy it can feel, this Cottage Cheese Alfredo Pasta is going to be your new weeknight favorite.

    It has everything you want from a classic Alfredo recipe. Rich, cozy, creamy, and satisfying. But instead of heavy cream, we blend cottage cheese into a silky smooth sauce that coats every bite of pasta beautifully.

    The best part? It’s ready in about 30 minutes and adds a serious protein boost. This is one of those feel-good comfort meals that works on a busy Tuesday and still feels special enough for the weekend.

    What You’ll Love About Cottage Cheese Alfredo Pasta

    • High protein: Thanks to blended cottage cheese
    • Creamy and satisfying: The cheese melts to a creamy base without needing heavy cream.
    • Quick & Easy: Ready in only 30 minutes.
    • Everyday Ingredients: Made with simple pantry ingredients. Nothing fancy needed.
    • Add Extra Protein: Easy to customize with chicken, shrimp, or extra veggies

    Ingredients for Cottage Cheese Alfredo Pasta

    For the Pasta

    • Dry pasta: Penne, rigatoni, or fettuccine work beautifully to hold the creamy sauce
    • Broccoli florets: Adds color, texture, and a boost of fiber and nutrients

    For the Cottage Cheese Alfredo Sauce

    • Olive oil: Helps sauté the garlic and adds richness
    • Garlic: Brings savory depth and warmth to the sauce
    • Cottage cheese: The high-protein base that blends into a silky, creamy sauce
    • Freshly grated Parmesan cheese: Adds salty, nutty richness and classic Alfredo flavor
    • Reserved pasta water: The secret to a glossy, clingy sauce
    • Sea salt: Enhances and balances all the flavors
    • Freshly ground black pepper: Adds subtle heat and brightness

    Optional for Serving

    • Chopped parsley: Adds freshness and color
    • Extra Parmesan: For a richer finish and extra flavor

    (See printable recipe card for full ingredient amounts)

    Cottage Cheese Alfredo Pasta

    How to Make Cottage Cheese Alfredo Pasta

    1. Cook the Pasta and Broccoli: Bring a large pot of well-salted water to a boil. Cook the pasta according to package directions. During the last 2 to 3 minutes of cooking, add the broccoli directly to the same pot. Before draining, reserve about 1½ cups of the pasta water. This starchy water helps create a silky sauce. Drain and set aside.
    2. Sauté the Garlic: Return the empty pot to medium heat. Add olive oil and minced garlic. Cook for about 30 seconds, just until fragrant. Do not let it brown. This quick step removes the harsh bite of raw garlic and deepens the flavor.
    3. Blend the Sauce: In a blender, combine the sautéed garlic, cottage cheese, Parmesan, 1 cup of reserved pasta water, salt, and pepper. Blend until completely smooth and creamy. The sauce should look glossy and pourable. If needed, add a little more pasta water to thin.
    4. Bring It Together: Return the pasta and broccoli to the pot. Pour the sauce over everything and toss gently over low heat until fully coated. Add more pasta water, a splash at a time, until the sauce reaches your desired consistency.
    5. Serve: Taste and adjust seasoning. Finish with extra Parmesan, freshly cracked black pepper, and chopped parsley. Serve warm and enjoy immediately.

    Tips & Variations

    • Add a protein boost: Add grilled chicken, shrimp, or rotisserie chicken for even more protein
    • Make it Gluten-free: Swap our the regular pasta for your favorite gluten-free pasta
    • Kick up the heat: Stir in red pepper flakes for a little heat
    • Swap the veggies: Swap broccoli for spinach, peas, or roasted mushrooms
    • Use the block: Use freshly grated Parmesan for the best flavor and texture
    • Leftover tip: If reheating leftovers, add a splash of water or milk to loosen the sauce

    The post Cottage Cheese Alfredo Pasta (High-Protein & 30 Minutes) appeared first on Elizabeth Rider – Modern Healthy Living.

  • A Comprehensive Guide to Watch Straps

    A Comprehensive Guide to Watch Straps

    A Comprehensive Guide to Watch StrapsA complete visual glossary to the other half of a watch’s appearance.

    The post A Comprehensive Guide to Watch Straps appeared first on Primer.

  • A Guide To Unconventional Dining Options In Sydney

    A Guide To Unconventional Dining Options In Sydney

    Sydney’s food scene is a vibrant collection of classic cafes, fine-dining restaurants and seafood joints peppered everywhere from Surry Hills to Circular Quay. These work if you take the city at face value, but the real magic happens when dining steps outside the expected. From lofty heights above the skyline and ever-changing backdrops to hidden dens tucked below street level, these inventive eateries offer an experience like no other — without any compromise on taste!

    Dining By the Ocean

    seaside restaurantseaside restaurant

    Sydney’s coastline is one of its greatest assets, and if there’s one thing Sydney does better than almost anywhere else, it’s enjoying food by the water. Ocean views aren’t exotic here — they’re everyday magic. Beaches frame meals, waves lap at nearby shores, and the sea breeze adds natural seasoning to the air.

    Fine Dining With Ocean Views

    If you’re looking for exquisite food while facing the ocean, Icebergs Dining Room and Bar should be your first choice. Perched above the southern end of Bondi Beach, this Italian-inspired restaurant is known for its elegant interpretation of the cuisine using fresh and seasonal produce, all while giving you uninterrupted views of the Pacific Ocean. The roar of the waves is part of the ambience, creating a sensory experience that elevates each course.

    🌊 Also worth a look: The Pantry and Hugos along Manly Beach offer relaxed yet very scenic meals with a more laid-back vibe — perfect if you want the views without the white tablecloths.

    Classic Beachside Kiosks

    Not every beachfront meal needs silverware and fine china. Local beach kiosks and casual seafood spots bring laid-back charm to ocean dining. Think fish and chippies, burgers and utterly indulgent seafood boils — best enjoyed when you’ve just had a swim and are craving something deliciously hot and messy.

    🐟 The vibe in a nutshell: Special occasion sunset meal? Icebergs. Post-swim hunger? Find the nearest kiosk and get messy. Sydney’s oceanfront scene covers both ends of the spectrum beautifully.

    Dining In The Sky

    Sydney Tower Sydney Tower

    If Sydney’s ocean is one way to feast with a view, the city skyline offers a completely different kind of backdrop. Sydney’s rooftop bars and revolving venues provide panoramas of the city lights and beyond — literally elevating your dining experience.

    Sky-High Revolving Restaurants

    Sydney Tower is a prime location with multiple dining options. Infinity and SkyFeast Buffet offer a 360° revolving view of the city while serving up some of the best food in town. And then there’s the iconic O Bar and Dining in Australia Square — a revolving restaurant above the city that gives every visitor a spectacular view of the harbour and skyline as it slowly turns.

    🌀 Pro tip: At a revolving restaurant, every seat gets the best seat in the house — eventually. Arrive at dusk for the full sky-to-lights transition during your meal.

    Rooftop Bars

    Sydney Tower’s Bar 83 combines striking vistas with expertly crafted cocktails and a full 360° view of the city below. In the bustling Barangaroo precinct, rooftop bars are peppered everywhere — some of the best include United – Rooftop Sydney, The Rook and Jimmy’s Rooftop. All mix cityscape views with handcrafted drinks and fusion-inspired small plates.

    ✨ Picture this: Sipping a martini above the city while Sydney moves underneath you. Sky-high dining delivers a feast for the eyes as well as the palate — and makes an ordinary Tuesday feel like an occasion.

    Dining on the Water

    dining harbour cruise with Opera House & Harbour Bridge in the backgrounddining harbour cruise with Opera House & Harbour Bridge in the background

    There’s something inherently magical about dining while gently drifting across the jewel of the city — Sydney Harbour. Sydney is a harbour city at heart, and a variety of dining cruises transform your lunch or dinner into an event, not just a meal.

    Sydney Harbour Lunch Cruises

    For a daytime experience that’s casual with great food and sunshine, a Sydney lunch cruise is your best bet. You’ll be treated to glittering water and views of iconic Sydney landmarks like the Opera House and Harbour Bridge, all twinkling as the sunlight hits them.

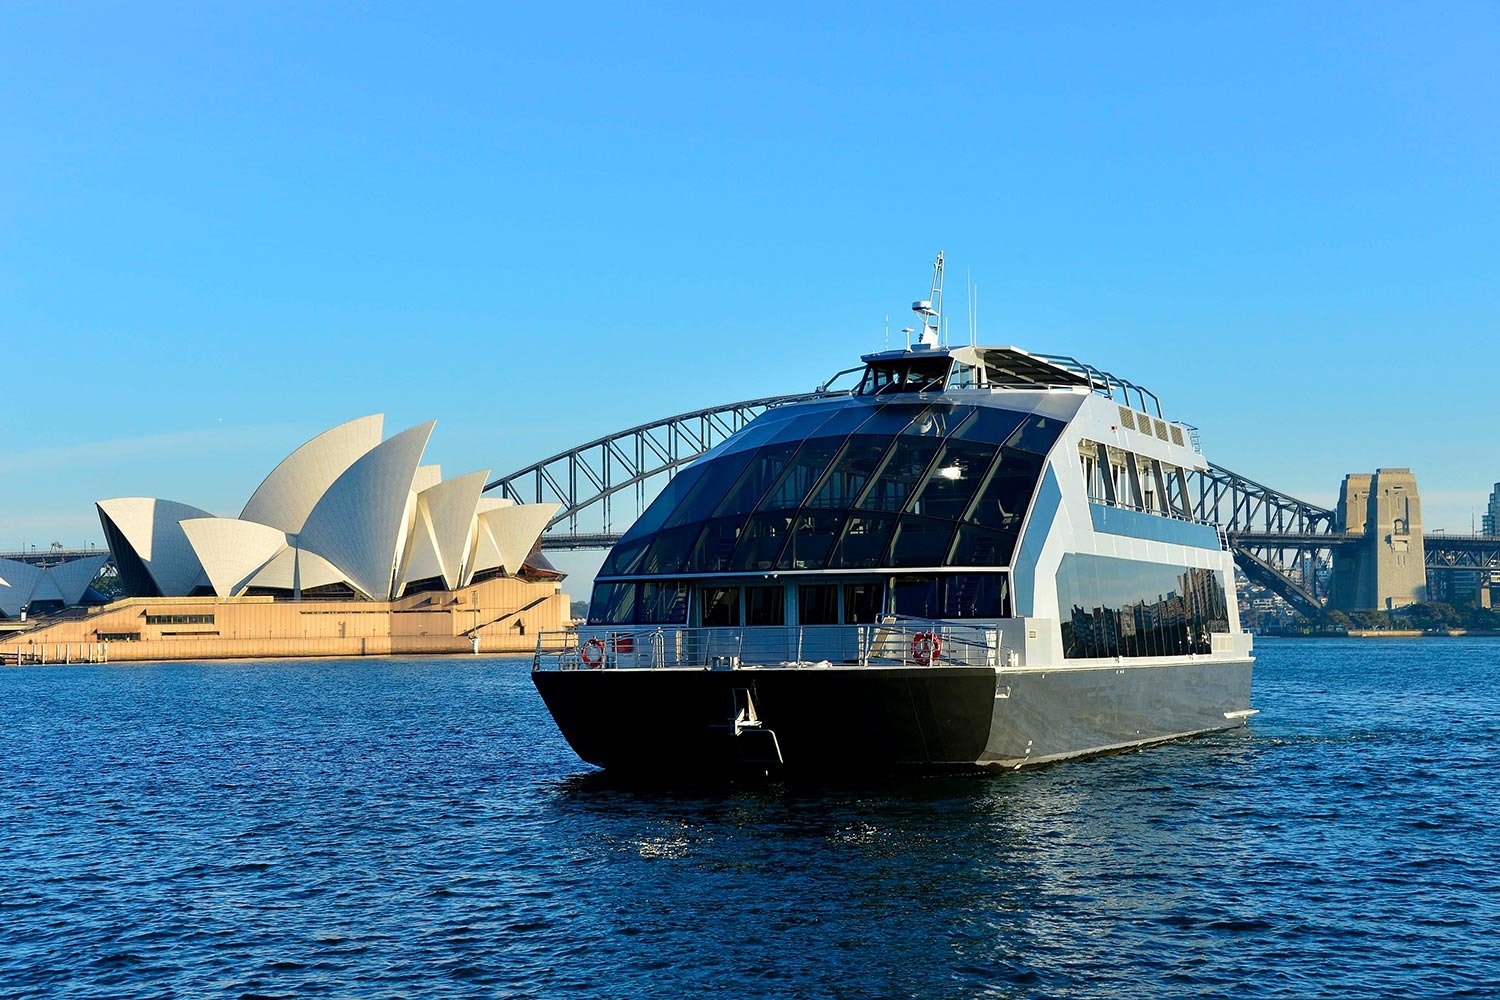
    🚢 Two-for-one win: A lunch cruise is basically sightseeing and a meal rolled into one. You get to tick off Sydney’s most iconic landmarks while eating good food with a drink in hand. Hard to beat.

    Sydney Harbour Dinner Cruises

    Dinner cruises on Sydney Harbour transition into evening glam. Under the glow of the city lights, a dinner cruise offers a more elegant approach to unconventional dining. Most cruises serve multi-course dinners, often paired with wine, drinks and even live entertainment — giving each meal an almost cinematic experience as you cruise by illuminated landmarks.

    Lunch vs. Dinner — which is right for you?

    Choose lunch if you want: sunshine, sightseeing, a casual vibe, and a more budget-friendly experience.

    Choose dinner if you want: city lights, romance, multi-course dining, and live entertainment under the stars.

    If you love the idea of combining great food with a memorable setting, you might also enjoy our guide to ways a cruise vacation can reset your health.

    Dining Underground

    image of pool tables in an underground barimage of pool tables in an underground bar

    Sydney’s unconventional dining culture wouldn’t be complete without its thriving underground scene. Beneath the city’s polished surfaces lie tucked-away bars and speakeasies that reward curious explorers with fun atmospheres, experimental drinks and surprising menus.

    Speakeasy Restaurants

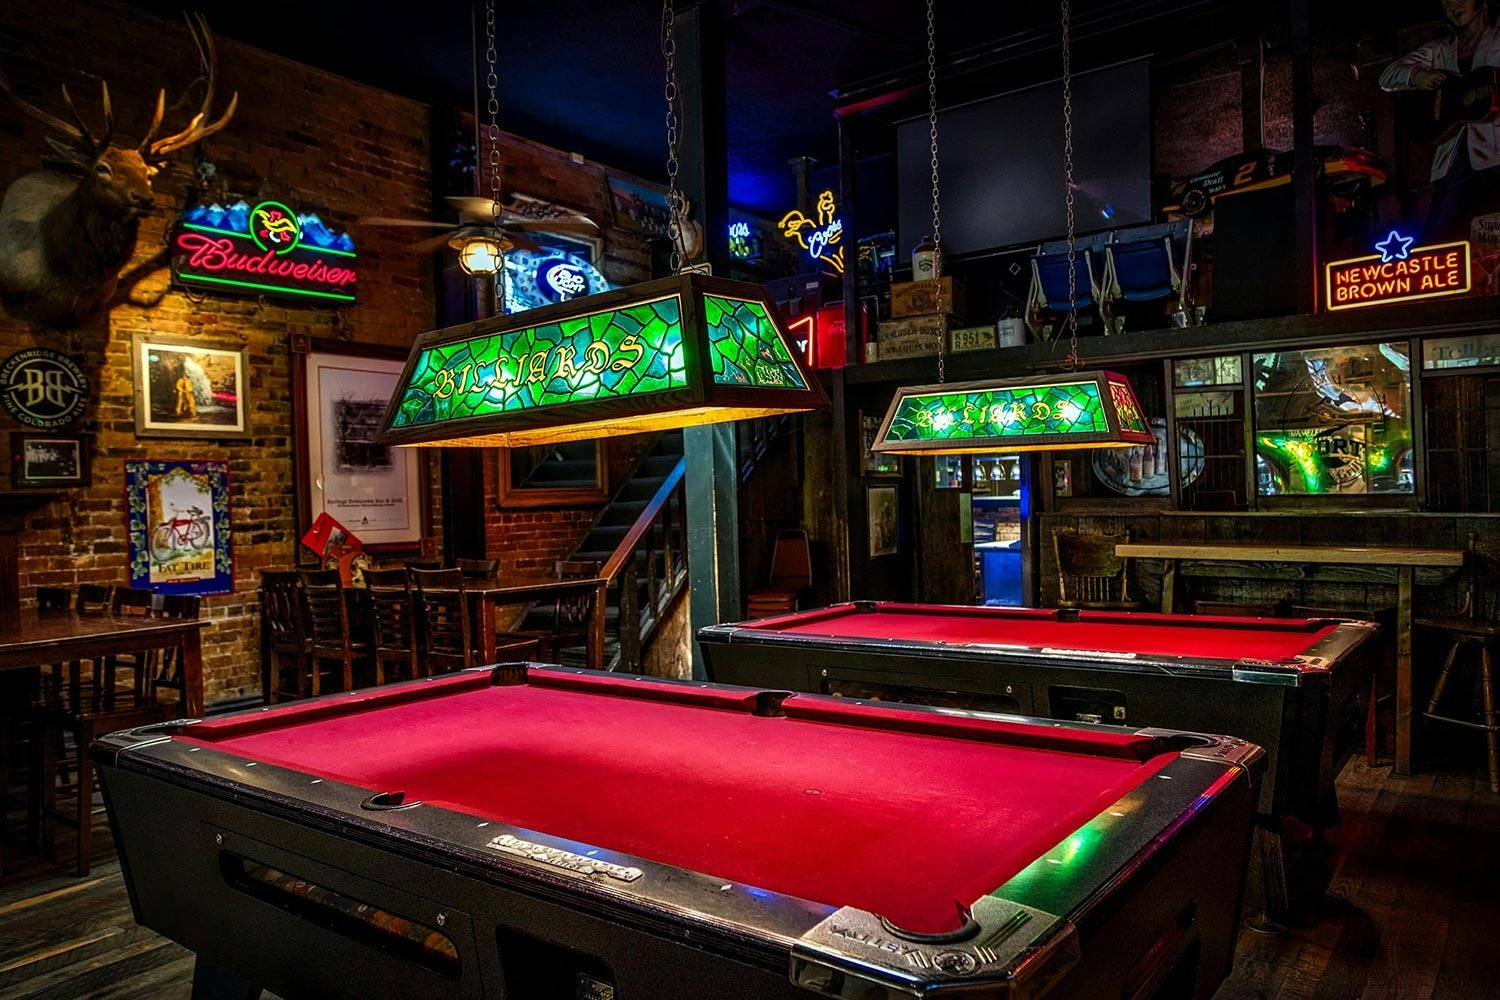
    🚪 Door Knock — A cocktail haven beneath Pitt Street. Inventive drinks, a moody interior, and a genuine Prohibition-era speakeasy feel.

    🥃 The Baxter Inn — Accessed by heading down a flight of stairs off Clarence Street. Hundreds of whiskies, an intimate atmosphere, and a beloved local following.

    Hidden Bars Sydney

    🎷 Burrow Bar & Double Deuce Lounge — Both lean into crafty cocktails, creative bar snacks and jazz music. The kind of places where the journey to find them is half the fun.

    Heads up: Many of these spots require reservations and a little direction to find. Plan ahead — it’s worth it.

    🕵 The underground rule: The harder a bar is to find, the better the cocktail tends to be. Sydney’s hidden bars operate on this principle religiously — and they deliver.

    Final Bite

    From ocean-lapped tables and sky-high drinks to gentle harbour cruises and dimly lit hidden bars, Sydney’s unconventional dining options invite you to eat with your senses fully engaged. They’re experiences that blend setting, scenery and service in ways that truly elevate mealtimes into fond memories.

    Planning a trip? Don’t forget our packing tips and luxury travel strategies before you go.

    About the Author

    Amanda Clark

    A Sydney-based travel writer who loves chasing experiences that defy expectations — especially when great food and entertainment are part of the mix. From unforgettable hits to unexpected flops, she shares real stories to keep the adventure honest and fun for everyone.

    The post A Guide To Unconventional Dining Options In Sydney appeared first on Better Living.