Author: admin

  • Does Sriracha Need to Be Refrigerated? Full Storage Guide

    ❄ The Short Answer

    Does sriracha need to be refrigerated? No, sriracha does not require refrigeration, even after the bottle has been opened.

    According to Huy Fong Foods, the maker of the most widely used sriracha, their products simply need to be stored in a cool, dry place. The vinegar base, capsaicin from the chilies, and added preservatives make the sauce shelf-stable at room temperature.

    That said, refrigeration is genuinely worth doing if you go through a bottle slowly. Cold storage slows oxidation, keeps the color brighter, and prevents the heat level from intensifying as quickly. You don’t have to refrigerate it, but if your bottle sits on the shelf for more than a few months, the fridge will keep it noticeably better for longer.

    Short answer: No refrigeration needed — opened or unopened. Store at room temperature in a cool, dark place for up to 6–9 months of best quality. Refrigerate if you use it slowly and want to maintain color and flavor for 12–18 months.

    📋 Sriracha Storage Quick Reference

    Storage Method Quality Window Best For
    Pantry, unopened 2+ years Long-term storage, stockpiling
    Pantry, opened 6–9 months Daily or frequent users
    Refrigerator, opened 12–18 months Occasional users, color preservation
    Freezer (ice cube tray) Indefinite Bulk storage only
    Homemade sriracha, opened 1–3 months (fridge only) Must be refrigerated — no pantry storage

    🏭 What Huy Fong Actually Says

    Huy Fong Foods has confirmed directly that their sriracha does not require refrigeration. The recommendation on their website is to store the product in a cool, dry place. The best-by date is lasered onto the bottle near the neck. You can often feel it with your fingers before you can read it visually.

    This guidance applies to their complete product line, not just the original sriracha. The combination of distilled vinegar, capsaicin, potassium sorbate, and sodium bisulfite makes refrigeration a quality choice, not a safety requirement.

    🎨 The Real Reason to Refrigerate Sriracha

    Refrigeration doesn’t prevent spoilage in commercial sriracha. It slows two specific quality changes that happen when the opened bottle sits at room temperature:

    Color darkening. Sriracha oxidizes when exposed to air. Over several months at room temperature, the bright red fades to a darker brownish-red. This is purely aesthetic and does not affect safety, but if you want your sriracha to stay vibrant, the fridge significantly slows oxidation. The cold also limits light exposure, which accelerates the same process.

    Heat intensification. As sriracha ages, the chili compounds continue to develop. An older bottle at room temperature will typically taste hotter than a fresh one. Some people prefer this. But if you want consistent, predictable heat, cold storage slows the process considerably.

    If you use a bottle within two to three months, neither of these changes will be noticeable. If your bottle sits for six months or more, refrigeration makes a meaningful difference in both color and flavor.

    🌡 Where to Store Sriracha in the Fridge

    If you do refrigerate sriracha, store it in the door compartment rather than the main shelves. The door is slightly warmer than the interior, which keeps the sauce more pourable. Cold sriracha from the main fridge shelves can thicken enough to be difficult to squeeze from the bottle, especially in a squeeze bottle format. Door storage avoids this without sacrificing the temperature benefit.

    🏠 Homemade Sriracha: Different Rules

    Everything above applies to commercial sriracha. Homemade sriracha operates under entirely different storage rules and should always be refrigerated.

    Without potassium sorbate, sodium bisulfite, or industrial pH control, homemade sriracha relies entirely on the natural preservation from vinegar, salt, and capsaicin. That provides some protection, but nowhere near enough for room-temperature storage once opened. Homemade sriracha left at room temperature is at real risk of mold growth, especially in warmer kitchens.

    Refrigerate homemade sriracha immediately after making it and use it within 1 to 3 months. Keep it in a clean glass jar with a tight lid. Do not store it on the counter between uses.

    ⚠ Sriracha Mixed With Other Ingredients

    The moment you mix sriracha into another sauce — sriracha mayo, sriracha aioli, sriracha butter, or any dip — the shelf-stability rules change completely. The other ingredients (mayo, dairy, eggs) dominate and the sriracha’s preservative qualities no longer protect the mixture.

    Any sriracha-based sauce or dip must be refrigerated and used within 3 to 5 days. Do not store these at room temperature under any circumstances.

    ✅ Signs Your Stored Sriracha Is Still Good

    • Red to dark red color (some darkening from room temp storage is normal)
    • Spicy, tangy, garlicky smell — recognizably sriracha
    • Pours or squeezes normally once shaken
    • Tastes like sriracha — possibly hotter than when new, but not sour or off
    • No visible mold patches around lid or on surface

    ❌ Signs to Discard It

    • Any visible mold — white, green, black, or gray patches on surface or cap
    • Sour, fermented, or distinctly off smell
    • Sauce won’t recombine after shaking — stuck clumps or hardened texture
    • Genuinely bad taste, not just extra heat
    • Bottle appears swollen or damaged

    ❓ Frequently Asked Questions

    Will refrigerated sriracha get too thick to use?
    It can thicken slightly in the coldest part of the fridge, but the sauce itself doesn’t solidify. Storing it in the door (warmer zone) and giving it a shake before use is enough to keep it pourable. If it seems very thick, let it sit at room temperature for a few minutes before using.

    Should I refrigerate sriracha after every use or only for long-term storage?
    If you use it at least once a week, room temperature storage is fine for 6 to 9 months. If you use it occasionally and the bottle will sit for many months, put it in the fridge. The decision is purely about quality, not safety.

    Does refrigerating sriracha change the taste?
    Refrigeration doesn’t change the flavor profile, it preserves it. Room-temperature storage is what changes the taste over time (hotter, more vinegary, less fresh). Cold storage maintains the original flavor more faithfully.

    Can I leave sriracha out on a restaurant table indefinitely?
    Restaurants do this routinely with commercial sriracha. It’s safe and standard practice. High-turnover bottles in busy restaurants get replaced often enough that quality doesn’t degrade significantly. A home bottle left on the counter for six months is a different situation than a restaurant bottle used many times a day.

    Does the brand matter for whether to refrigerate?
    It matters for homemade or artisan srirachas with fewer preservatives, these need refrigeration. Commercial brands like Huy Fong with added preservatives are genuinely shelf-stable. Always check the label on smaller brands for their specific storage guidance.

    What about the USDA’s recommendation?
    The USDA FoodKeeper app recommends using opened chili sauces within 6 months at room temperature — a conservative quality guideline, not a strict safety cutoff. Most commercially produced sriracha will remain good beyond this window, but 6 months is a reasonable target for best flavor.

    🧂 Related Food Storage Guides

    🍳 Recipes That Use Sriracha

    The post Does Sriracha Need to Be Refrigerated? Full Storage Guide appeared first on Better Living.

  • Does Sriracha Go Bad? Shelf Life, Spoilage Signs & Storage Tips

    🌶 The Short Answer

    Does sriracha go bad? Yes, but very slowly, and almost never in a way that makes it unsafe to eat.

    Sriracha is built to last. Its main ingredients (chili peppers, distilled vinegar, salt, and garlic) are all natural preservatives, and commercial brands like Huy Fong add potassium sorbate and sodium bisulfite on top of that. The result is one of the most shelf-stable condiments in your kitchen.

    What actually happens over time is quality decline, not spoilage. The color shifts from bright red toward a darker brownish-red. The heat level changes, and not in the direction most people expect. The bigger concern is knowing the difference between a bottle that’s genuinely gone bad versus one that’s just aged normally.

    Short answer: An unopened bottle of sriracha lasts 2 years or more at room temperature. Once opened, it stays good for at least 6 months at room temp and over a year refrigerated. It rarely spoils in a way that’s unsafe, but it will lose quality and change character over time.

    📅 Sriracha Shelf Life at a Glance

    Condition Pantry Refrigerator
    Unopened (commercial) 2+ years Indefinite
    Opened (commercial) 6–9 months (best quality) 12–18 months
    Past best-by date (unopened) Often fine 6–12 months beyond
    Homemade sriracha (opened) Not recommended 1–3 months
    Sriracha mayo or mixed sauces Not safe 3–5 days only

    These figures apply to Huy Fong and comparable commercial brands. The 6–9 month pantry window is Huy Fong’s own recommendation for best flavor — the sauce won’t suddenly become unsafe the day it hits month 10, but quality will be noticeably different.

    🔬 Why Sriracha Lasts So Long

    Three things work together to make sriracha exceptionally shelf-stable:

    Distilled vinegar. Vinegar is a natural antimicrobial. Its acidity (low pH) creates an environment where most bacteria and mold cannot survive. This is the same reason vinegar-based hot sauces outlast dairy-based or fruit-based ones by a wide margin.

    Capsaicin. The compound that makes chili peppers hot also has antimicrobial properties. Capsaicin inhibits bacterial growth across a wide range of pathogens, which is part of why pure hot sauces have historically been used as food preservatives in warm climates. A 2023 review published in Nutrients confirms capsaicin’s antibacterial and antifungal activity against bacteria including Salmonella, E. coli, and Staphylococcus aureus.

    Added preservatives. Commercial sriracha (Huy Fong and most other brands) includes potassium sorbate and sodium bisulfite. These extend shelf life further and slow the color and flavor changes that happen with air exposure. Homemade sriracha has none of these, which is why it needs refrigeration and has a much shorter window.

    🌡 Why Sriracha Gets Spicier Over Time

    This surprises most people. As sriracha ages, the bright, fresh chili and garlic notes tend to degrade faster than the capsaicin itself, which shifts the flavor balance. That means an older opened bottle will typically taste hotter than a fresh one, even if the total capsaicin content hasn’t changed. Huy Fong notes this directly: the sauce may become spicier as the chilis age. This is a quality change, not a safety issue, but it’s worth knowing if you find your sriracha seems more intense than you remember.

    Refrigeration slows this process significantly. If you prefer consistent heat, keep the bottle cold.

    🎨 Color Change: Normal or Spoilage?

    Color darkening is one of the most common reasons people throw out perfectly good sriracha. It is almost always normal.

    Fresh sriracha is a vibrant, bright red. Over time, typically after several months opened at room temperature — it shifts toward a deeper, more muted brownish-red. This is oxidation, the same chemical process that darkens cut apples, avocado, and most other red or orange foods when exposed to air. It does not mean the sriracha has spoiled.

    The color change happens faster at room temperature and slower in the refrigerator, which is the main practical reason to refrigerate an opened bottle even though it is not required for safety.

    The only color change that signals a real problem: patches of a different color (white, green, black, gray) that look like mold growth on the surface or around the lid. That is not oxidation. That is contamination, and the bottle should be discarded.

    🧫 Sauce Separation: Is It Spoilage?

    You may notice some liquid sitting at the top of a bottle that has been stored for a while. This is normal separation, the water content migrates away from the denser solids. It is not a sign the sauce has gone bad. Shake the bottle well before using and the sauce will recombine.

    Separation that cannot be recombined by shaking. Thick clumps, hardened solids that won’t break up, or a texture that seems fundamentally different from what you bought is a different matter and worth inspecting more carefully alongside the smell and taste.

    🏠 Homemade vs. Store-Bought: A Key Difference

    Commercial sriracha is formulated for shelf stability. Homemade sriracha is not. Without industrial preservatives, homemade versions rely entirely on the natural preservation from vinegar, salt, and capsaicin — which is meaningful but limited.

    Homemade sriracha should always be refrigerated and used within 1 to 3 months. Do not leave it at room temperature. The same applies to any sriracha-based sauce you make at home. Sriracha mayo, sriracha aioli, sriracha butter — all of these need refrigeration and have a window of just a few days.

    ✅ Signs Sriracha Is Still Good

    • Bright to medium-dark red color (some darkening is normal)
    • Pours or squeezes normally from the bottle
    • Smells spicy, tangy, and garlicky — recognizably like sriracha
    • Tastes as expected, possibly hotter than when new
    • No visible growth around the lid or on the surface

    ❌ Signs Sriracha Has Gone Bad

    • Visible mold — any color other than red — on the surface or around the lid
    • Sour, fermented, or off smell that doesn’t resemble normal sriracha
    • Texture that has thickened to the point the sauce won’t pour or shake loose
    • Taste that is genuinely off — not just hotter, but sour or unpleasant
    • Bottle that looks swollen, leaking, or damaged before opening

    📍 Finding the Best-By Date on a Huy Fong Bottle

    The best-by date on Huy Fong sriracha is not printed in an obvious spot. It is lasered directly onto the bottle near the neck. You can often feel the slight impression with your fingers more easily than you can read it visually. If you can’t find it, that’s why.

    The date is a best-quality guideline, not a safety cutoff. An unopened bottle stored in a cool, dark pantry is typically still fine 6 to 12 months past the printed date, especially if the bottle is intact and the seal has never been broken.

    ❓ Frequently Asked Questions

    Can sriracha make you sick?
    Properly stored sriracha that has not developed mold or an off smell is extremely unlikely to make you sick. The vinegar and preservatives make it inhospitable to harmful bacteria. The greater risk is from cross-contamination — double-dipping a utensil into the bottle repeatedly introduces bacteria from other foods.

    Why does my sriracha smell more vinegary than usual?
    As sriracha ages, the chili and garlic compounds break down while the vinegar becomes more prominent. A more vinegary smell in an older bottle is normal quality decline, not spoilage — as long as there’s no mold and the sauce still tastes like sriracha.

    Does freezing sriracha work?
    Yes, but it requires a bit of effort. The sauce won’t freeze solid in a standard bottle (the vinegar lowers the freezing point), but for long-term storage you can freeze it in an ice cube tray and transfer the cubes to an airtight bag. It keeps indefinitely frozen and thaws quickly. Most people won’t need this unless they buy in bulk.

    Is sriracha still good if the cap has dried sauce on it?
    Dried sauce around the cap is normal. Wipe it clean before using to avoid introducing dried, potentially contaminated material back into the bottle. The sauce inside is unaffected.

    Does the type of sriracha brand matter for shelf life?
    Brands that include added preservatives (potassium sorbate, sodium bisulfite) like Huy Fong will last longer than brands with a simpler, more natural ingredient list. Always check the label. Artisan or small-batch srirachas with fewer preservatives are closer to homemade in terms of shelf life and should be treated accordingly.

    Can I use sriracha that’s turned brown?
    Yes, in almost all cases. Browning is oxidation, not spoilage. The flavor will be somewhat different — usually hotter and with a more muted freshness — but it is safe to eat. If the only issue is color, use it up and buy a fresh bottle when it runs out.

    My sriracha is past its best-by date but smells and tastes fine. Is it okay?
    Yes. The best-by date reflects peak quality, not a safety threshold. If it smells like sriracha, tastes like sriracha, has no mold, and pours normally, it is fine to use.

    🧂 Related Food Storage Guides

    🍳 Recipes That Use Sriracha

    The post Does Sriracha Go Bad? Shelf Life, Spoilage Signs & Storage Tips appeared first on Better Living.

  • International Women’s Day!

    International Women’s Day!

    Wishing all the ladies a very happy International Women’s Day!

    Today is our day, and we make a difference in the world!

  • How to Get Tomato Sauce Out of Clothes: What Actually Works

    How to Get Tomato Sauce Out of Clothes: What Actually Works

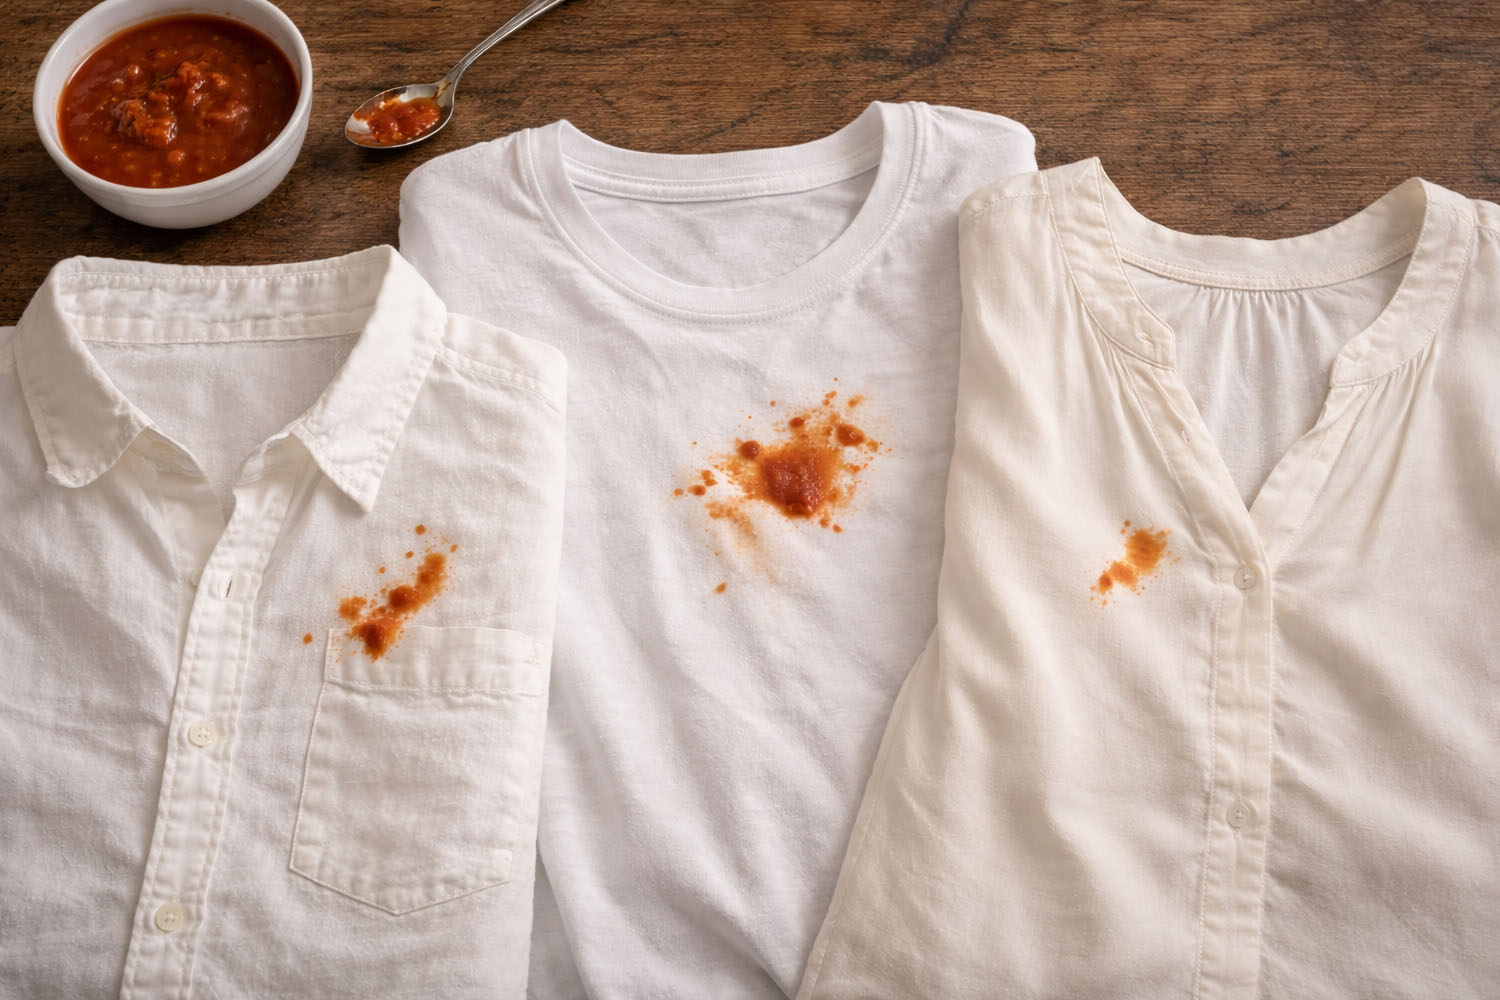
    Learning how to get tomato sauce out of clothes is one of those skills you pick up the hard way. Usually mid-dinner, and usually on something white.

    One second I was serving spaghetti. The next, half a bowl of marinara was sliding down the front of my white linen shirt in slow motion. The shirt I’d owned for three years without a single stain.

    I did what anyone would do: grabbed a napkin and made it worse.

    Here’s what nobody tells you about tomato sauce stains: they’re not like other stains.

    You can’t just throw them in the wash and hope for the best. Tomato sauce laughs at your washing machine. It comes out looking almost exactly the same as when it went in, sometimes darker, always more set. I know this from painful, repeated, completely avoidable experience.

    So I did what I did after ruining a shirt with red wine: I got systematic about it.

    I stained fresh shirts and dried shirts, tested every method I could find, ranked them honestly, and documented what actually worked.

    No guesswork. No methods that sound good but don’t hold up.

    Here’s the full breakdown.

    Quick Answer: How to Get Tomato Sauce Out of Clothes: Scrape off the excess. Don’t rub. Flush with cold water through the back of the fabric. Apply dish soap directly to the stain and work it in gently. Soak in cold water with white vinegar for 20 to 30 minutes. For white fabrics, use a hydrogen peroxide and dish soap mixture for best results. Launder in cold water. Never put it in the dryer until the stain is completely gone.

    Why Tomato Sauce Stains Are So Stubborn

    Tomato sauce isn’t one stain. It’s three stains layered on top of each other, and each component needs a different approach to break down.

    Lycopene (the red pigment): This is what gives tomatoes their deep red color. Lycopene is fat-soluble, which means water alone won’t touch it. It bonds to fabric fibers and doesn’t let go without a surfactant like dish soap or detergent to break that bond.

    Oil: Most tomato sauces, including marinara, pasta sauce, and pizza sauce, are cooked in olive oil. That oil embeds itself in fabric fibers right alongside the red pigment, creating a greasy stain beneath the visible one.

    Acidity: Tomatoes are naturally acidic. That acidity can actually accelerate the staining process, essentially curing the pigment into natural fibers like cotton and linen over time.

    According to the American Cleaning Institute, the key to removing tomato sauce is acting fast and always flushing the stain from the back of the fabric, never the front. Understanding the triple-threat chemistry is what makes that advice actually make sense.

    The Golden Rule: Scrape First, Always

    This is where most people go wrong immediately.

    When tomato sauce lands on your shirt, the instinct is to wipe. Don’t. Wiping spreads the sauce sideways and pushes it deeper into the fabric, turning a small stain into a big one.

    Instead, scrape. Use a spoon, a dull knife, or the edge of a credit card. Anything that lifts the sauce off the surface without pressing it in further. Work from the outside of the stain inward.

    Then run cold water through the back of the stain, not the front. Pushing water through from behind forces the sauce back out the way it came. This one step makes everything else work better.

    Time test: I stained five identical white cotton shirts and treated them at 5 minutes, 15 minutes, 1 hour, 4 hours, and 24 hours. The 5-minute shirt came out completely clean. The 24-hour shirt still had a faint orange ring after two full treatments. Act fast.

    5 Methods I Tested (Ranked Worst to Best)

    Three white garments laid flat on a dark wood surface, each with a fresh tomato sauce splatter stain: a button-down dress shirt on the left with a stain on the breast pocket, a crew-neck t-shirt in the center with a larger splattered stain on the chest, and a sleeveless blouse on the right with a smaller stain near the neckline. In the upper left corner, a white ceramic bowl of tomato sauce and a silver spoon with sauce residue rest on the wood surface.Three white garments laid flat on a dark wood surface, each with a fresh tomato sauce splatter stain: a button-down dress shirt on the left with a stain on the breast pocket, a crew-neck t-shirt in the center with a larger splattered stain on the chest, and a sleeveless blouse on the right with a smaller stain near the neckline. In the upper left corner, a white ceramic bowl of tomato sauce and a silver spoon with sauce residue rest on the wood surface.

    1

    Method 1: Cold Water and Dish Soap Alone (The Baseline)

    This is the most instinctive approach. Grab the dish soap, add cold water, work it in. And it isn’t useless. Dish soap is a degreaser, and since tomato sauce contains oil, it has a real job to do here.

    Apply dish soap (blue Dawn is my go-to, same as the red wine method) directly to the stain. Work it in gently with your fingers in a circular motion. Let it sit 5 minutes, then rinse with cold water.

    My results: This cleared most of the greasy oil component, but the red lycopene pigment was still obviously there. The shirt looked cleaner but had a clear orange-red mark. About 50% improvement on a fresh stain.

    Verdict: Not sufficient on its own, but it’s the right first step before applying anything else. Always start here.

    2

    Method 2: Baking Soda Paste (Overhyped)

    This one gets recommended constantly online. The idea is that baking soda’s alkalinity neutralizes the tomato acidity and draws the pigment out as it dries.

    Make a thick paste with baking soda and a small amount of water, apply to the stain, let it dry completely (about 30 minutes), brush it off, then rinse.

    My results: Honestly disappointing. It didn’t do much beyond what dish soap alone had already accomplished. Messy, time-consuming, and the result was about the same as Method 1.

    Verdict: Skip this for clothing. It works better on carpet and upholstery where liquids aren’t practical. On fabric, the vinegar soak below beats it every time.

    3

    Method 3: White Vinegar Soak (Solid for Colors)

    After the dish soap pre-treatment, mix one part white vinegar with two parts cold water and soak the stained area for 20 to 30 minutes. Then launder as normal in cold water.

    It sounds counterintuitive to add more acid to an acid-based stain, but white vinegar helps break the bond between the lycopene and the fabric fiber, loosening the pigment’s grip without damaging color.

    My results: A significant step up from dish soap alone. About 75% of the fresh stain lifted. The orange tint was much fainter but still visible on close inspection. The vinegar smell washed out completely.

    Verdict: The go-to for colored fabrics where hydrogen peroxide isn’t an option. More than enough for most light, fresh stains.

    4

    Method 4: OxiClean or Enzyme Stain Remover (Best for Colors)

    Oxygen-based cleaners like OxiClean release oxygen ions that break apart the chemical bonds holding the stain to fabric. Enzyme-based removers (Spray ‘n Wash, Zout) target the organic compounds in the sauce directly. Both handle the layered nature of tomato stains better than anything else in the colored-fabric category.

    For OxiClean: mix one scoop with warm water per package directions, submerge the stained area, and soak for 1 to 6 hours. For enzyme sprays, apply directly, work it in, and let sit at least 10 minutes before washing.

    My results: The best result I got for colored fabrics. A fresh stain soaked two hours in OxiClean came out essentially perfect. Even a four-hour-old stain came out clean after a longer soak. The enzyme spray was equally effective on fresh stains.

    Verdict: The best choice for anything colored. Especially effective when the sauce is oil-heavy (pasta sauce, marinara). Worth keeping in your laundry kit.

    ⚠ Important: Do Not Mix OxiClean and Vinegar: If you’re using OxiClean, don’t use white vinegar in the same treatment session. OxiClean breaks down into hydrogen peroxide when it contacts water. Combining hydrogen peroxide with vinegar creates peracetic acid, which can irritate skin and eyes and may damage fabric fibers over time. Use one or the other per session, not both. If you want to try vinegar after an OxiClean soak, rinse the garment completely first, then launder, and treat with vinegar only if the stain persists in a separate session.

    5

    Method 5: Hydrogen Peroxide + Dish Soap (The Winner, White Fabrics Only)

    Just like with red wine, this combination won the test. Hydrogen peroxide is a mild oxidizer that breaks down the lycopene pigment at the molecular level, while the dish soap handles the oil component at the same time.

    Important: Only use this on white or very light-colored fabrics. Hydrogen peroxide has a bleaching effect and can permanently lighten or spot colored clothing.

    Here’s exactly how I do it:

    1. Mix 3 parts hydrogen peroxide (standard 3% drugstore grade) to 1 part blue Dawn dish soap.
    2. Pour the mixture directly onto the stain, fully saturating it.
    3. Let it sit for 20 to 30 minutes. You’ll see the stain begin to lighten almost immediately. That’s the peroxide reacting with the lycopene.
    4. Rinse thoroughly with cold water from the back of the stain.
    5. Check before washing. If still visible, repeat once more.
    6. Launder in cold water and air dry. Never put it in the dryer until the stain is completely gone.

    My results: The fresh stain was completely undetectable after one treatment. I genuinely could not find where it had been. A shirt left four hours before treating came out clean after two applications.

    Verdict: This is now my go-to for anything white. Cheap, uses stuff already under your sink, and genuinely impressive results.

    Pro Tip for Tough Stains: For particularly stubborn stains on white fabrics, oxygen bleach powder is a strong option, much gentler than chlorine bleach while still effective at lifting deep stains. And if you have an enzyme-based stain remover on hand, use it after the initial treatment and give it time to work before washing. Enzyme cleaners are specifically designed to break down the organic compounds in food stains.

    How to Get Dried Tomato Sauce Out of Clothes

    Dried stains are harder but not hopeless. The key difference is that you need to rehydrate the stain before treating it. Applying solutions to completely dry, crusted sauce is like trying to dissolve concrete.

    Step 1: Scrape off any dried crust with a spoon or butter knife. Don’t skip this.
    Step 2: Soak the stained area in cold water for 10 to 15 minutes to rehydrate.
    Step 3: Apply your chosen treatment (hydrogen peroxide mix for white, OxiClean or vinegar for colors).
    Step 4: Extend your soak time to 45 to 60 minutes instead of the usual 20 to 30.
    Step 5: Be prepared to repeat two to three times for stubborn, set-in stains.

    For stains that have been sitting a day or more, I had the best results doing a first pass with dish soap and cold water to loosen things up, letting it air dry, then going back in with the hydrogen peroxide treatment for white fabrics or an OxiClean soak for colors.

    What If It Already Went Through the Dryer?

    This is the question almost nobody answers well, and the most frustrating situation to be in. You washed the shirt, the stain was not fully gone, you threw it in the dryer anyway, and now the heat has essentially baked the pigment into the fabric.

    The honest truth: heat-set stains are much harder to remove, with no guarantee. But here’s what has worked for me:

    Step 1: Apply liquid dish soap to the stain and work it in firmly (you can be more aggressive with a dried, heat-set stain). Let it sit 15 minutes.

    Step 2: Mix OxiClean with warm water and soak the entire garment for 6 to 8 hours or overnight. This gives the oxygen ions maximum time to break down the set stain.

    Step 3: After the soak, apply the hydrogen peroxide and dish soap mixture directly. This second round of oxidation often breaks through what the OxiClean loosened.

    Step 4: Never back in the dryer until the stain is definitively gone. For heat-set stains, expect two to four treatment rounds.

    I’ve successfully removed heat-set tomato stains this way about 70% of the time. The remaining cases, typically old stains on silk or linen where the fibers had really absorbed the pigment, may need a professional cleaner with commercial-grade oxidizers.

    Tomato Sauce on White Clothes: One Extra Step

    White clothes are both the easiest and the most nerve-wracking scenario. Easiest because you can use hydrogen peroxide without worrying about bleaching. Hardest because any remaining orange tinge is brutally visible.

    For white fabrics, I add one step after washing: sunlight.

    If there’s still a faint ghost stain after laundering, hang the garment in direct sunlight while still damp. UV light acts as a natural bleaching agent and is remarkably effective at eliminating residual tomato pigment. Leave it two to four hours in strong sun.

    This trick has saved two shirts I thought were genuinely ruined. It only works while the fabric is still damp. The stain needs to be wet for UV activation to do its thing.

    How to Remove Tomato Stains by Fabric Type

    The method matters, but so does what you’re working with. Here’s what I found works best per fabric:

    Cotton and cotton blends: The most forgiving. Handles hydrogen peroxide, OxiClean, and vinegar soaks equally well. Multiple wash cycles won’t cause damage, so you can treat aggressively.

    Jeans and denim: Denim’s tight weave actually helps here — the sauce tends to sit on the surface rather than penetrating deeply. Dish soap and cold water first, then a vinegar soak. Avoid hot water, which can fade denim unevenly.

    Linen: Tricky because its open weave allows stains to penetrate quickly and set fast. Act immediately, be patient, expect to repeat. Extended OxiClean soaks (four to six hours) work best for colored linen; hydrogen peroxide mix for white linen.

    Polyester and synthetics: Synthetic fibers don’t absorb liquid as readily as natural ones, so the sauce tends to sit on the surface longer. Dish soap alone often handles fresh stains on polyester. Add a vinegar soak for anything stubborn.

    Silk: Avoid hydrogen peroxide entirely, as it can permanently damage silk fibers. Skip vigorous scrubbing too. Blot as much as possible, then take it to a dry cleaner. If treating at home: cold water with a small amount of gentle detergent (like Woolite), soak no more than 5 minutes, rinse very gently.

    Wool and cashmere: Hand wash only in cold water with a specialty wool detergent. No agitation that could cause felting. For anything valuable, professional cleaning is the safest call. Never put wool in the dryer.

    Pasta Sauce, Pizza Sauce, Marinara, Ketchup: Does the Type Matter?

    The stain is fundamentally the same, but oil content varies, and that changes how aggressive you need to be with the degreasing step.

    • Marinara and pasta sauces: Most oil-heavy. Start with dish soap before any other treatment to tackle the grease layer first.
    • Pizza sauce: Often thicker and more concentrated, which means it can penetrate deeply if not scraped quickly. Treat the same as marinara.
    • Ketchup: Lower in oil but high in sugar, which makes the stain sticky and potentially darker if heated. The vinegar soak works particularly well for ketchup. Act fast because the sugar content means it sets quickly.
    • Canned crushed tomato (no oil): Actually the easiest, since you’re only dealing with lycopene and not an oil layer. The vinegar soak alone often handles this completely.

    What Definitely Doesn’t Work

    Warning: Never Do These Things: According to Consumer Reports and the American Cleaning Institute, these common “solutions” make tomato stains worse or permanent:

    • Hot water: Heat sets the stain into the fabric permanently. Always use cold water.
    • Rubbing the stain: Spreads it sideways and pushes it deeper into the weave. Blot and scrape only.
    • Dryer before the stain is gone: Dryer heat permanently locks in any residual pigment. Inspect carefully in good light before drying.
    • Chlorine bleach on colors: Will remove the stain and your garment’s color along with it. Use oxygen bleach (OxiClean) instead.
    • Toothpaste: Gets recommended online frequently. Works no better than dish soap and is harder to rinse out completely.

    My Step-by-Step Emergency Protocol

    Based on everything I tested, here’s exactly what I do now. I keep a version of this on a notecard inside my laundry room cabinet.

    Step 1: Scrape off excess sauce with a spoon or card edge. Don’t rub. If you’re away from home, blot carefully with a napkin without spreading.

    Step 2: Run cold water through the back of the stain. This is the single most important physical action you can take.

    Step 3: Apply blue Dawn directly to the stain, work in gently with fingertips for one to two minutes. This tackles the oil component. Rinse.

    Step 4: White fabric gets the hydrogen peroxide and dish soap mixture, left to sit 20 to 30 minutes. Colored fabric gets a vinegar soak or enzyme spray, also left to sit 20 to 30 minutes.

    Step 5: Wash in cold water with your regular detergent.

    Step 6: Check the stain in good light with the fabric stretched flat. Any trace remaining? Repeat Steps 4 and 5 before it goes anywhere near the dryer.

    The Stain-Fighting Kit Worth Putting Together

    After my red wine stain testing, I put together a small container in my laundry room with everything I need. The tomato sauce experience confirmed the same kit handles both, along with pretty much every other food stain.

    • Hydrogen peroxide (3%, standard drugstore bottle)
    • Blue Dawn dish soap (small bottle)
    • White vinegar (in a spray bottle for easy application)
    • OxiClean Versatile Stain Remover (small container, for colored fabric soaks)
    • Clean white cloths or old t-shirt scraps for blotting
    • A dull-edged spatula or old credit card for scraping

    Total cost: under $15. The shirts it saves make it worth every penny. And if you’re interested in keeping your whole home clean with natural, non-toxic solutions, this kit is a perfect starting point.

    Frequently Asked Questions

    Does tomato sauce stain permanently?
    Not if you treat it quickly. Fresh tomato sauce stains are very removable. If you let the stain dry and set, especially through a hot dryer, the lycopene can bond permanently to fabric fibers. Even many older stains can be significantly reduced or eliminated with persistent treatment.

    Can I get tomato sauce out after washing?
    Yes, as long as it hasn’t been through the dryer. If you washed it but the stain is still there, treat it again before rewashing. Once it’s been through the dryer, you’re dealing with a heat-set stain (see above), which requires more aggressive treatment but is often still removable.

    Why does tomato sauce leave an orange mark after washing?
    That orange ring is residual lycopene, the fat-soluble pigment in tomatoes. Regular washing alone won’t remove it. You need hydrogen peroxide for white fabrics, an enzyme stain remover, or OxiClean to target that specific pigment. The vinegar soak also helps break it down.

    Does hot water help remove tomato stains?
    No. Hot water is one of the worst things you can use. Heat sets stains by causing pigments to bond more tightly to fabric fibers. Always use cold water, from treatment through laundering.

    Is the treatment the same for spaghetti sauce and pizza sauce?
    Essentially yes. All tomato-based sauces contain lycopene and oil, so the approach is the same. Sauces with higher oil content, which includes most pasta sauces, benefit from an extra dish soap pre-treatment to address the grease layer first. Pizza sauce is thicker, so scraping before treatment is especially important.

    Final Thoughts

    Tomato sauce stains feel catastrophic in the moment. But with the right approach, scraping first, cold water always, dish soap for the oil, hydrogen peroxide or OxiClean for the pigment, almost every fresh stain is fully recoverable.

    The two biggest lessons from testing: time matters more than anything else, and the dryer is your enemy until the stain is completely gone. White fabrics are actually easier to treat than colored ones once you’re willing to use hydrogen peroxide.

    Keep that stain kit stocked. It takes five minutes to put together and will save you a shirt or two every year.

    Have a method that worked, or a stain that stumped everything? Drop it in the comments. I’m always looking to update this guide.

    The post How to Get Tomato Sauce Out of Clothes: What Actually Works appeared first on Better Living.

  • 20 Useful Ways To Reuse Coffee Grounds

    ☕ What Can You Do With Used Coffee Grounds?

    Used coffee grounds are packed with nitrogen, caffeine, antioxidants, and natural oils — and most people throw them straight in the bin. Don’t. They can be used as a body scrub, natural deodorizer, dry rub for meat, garden compost ingredient, furniture scratch repair, and much more. Most uses cost absolutely nothing.

    ⚡ Start tonight: Set a small bowl of dried grounds in your fridge. They absorb odors just like baking soda — and you already have them.

    There’s nothing quite like a fresh cup of coffee at home. But if you brew every day, you’re also quietly generating one of the most underrated household resources around: used coffee grounds.

    Most of us toss them without a second thought. That’s a genuine waste. Spent grounds retain significant amounts of nitrogen, caffeine, chlorogenic acids, and natural oils from the bean — compounds with real utility in the garden, bathroom, kitchen, and beyond.

    We’ve gone through the research, checked the science, and cut through the myths to bring you 20 practical ways to put them to work.


    💆 Beauty & Skincare Uses for Coffee Grounds

    Research confirms that spent coffee grounds contain caffeine, chlorogenic acids, and natural oils — all with documented benefits for skin when applied topically.

    1

    ✨ DIY Body Scrub and Exfoliant

    Coffee grounds don’t dissolve in water, making them a natural physical exfoliant. The gritty texture buffs away dead skin cells without the synthetic microplastics found in many commercial scrubs. A 2023 review in the journal Cosmetics (MDPI) confirmed that both caffeine and chlorogenic acids in spent grounds have documented antioxidant, anti-aging, and photoprotective properties when applied topically. A 2016 study in Photochemical & Photobiological Sciences found that topical application of spent coffee ground extracts reduced UVB-induced wrinkle formation in mice by over 35% and suppressed collagen breakdown. The bioactive compounds responsible are well-established in the cosmetic science literature.

    🍽 How to use it: Mix 2 tablespoons of used grounds with 1 tablespoon of coconut oil or plain yogurt. Massage onto damp skin in circular motions for 60 seconds, then rinse with warm water. Use 1–2 times a week. Note: grounds can be too coarse for sensitive facial skin — test a small patch first.

    2

    👁 Reduce Under-Eye Puffiness

    Caffeine is a vasoconstrictor — it temporarily narrows blood vessels — which is why it’s a staple ingredient in commercial eye creams and depuffing skincare. Applied around the eyes, it may reduce puffiness and dark circles by improving microcirculation. The Cosmetics (2023) review reported that a 3% caffeine pad applied around the eyes over four weeks produced measurable improvements in skin elasticity, hydration, and pigmentation in study participants.

    🍽 How to use it: Mix a small amount of very finely ground used coffee with cooled brewed coffee or aloe vera gel. Dab gently under the eyes with a cotton pad, leave 10 minutes, then rinse with cool water. Never get grounds directly in your eyes.

    3

    🦵 Anti-Cellulite Scrub

    Caffeine’s lipolytic action — its ability to stimulate fat-metabolizing enzymes — is one of the primary reasons it appears in nearly every commercial anti-cellulite product. The same 2023 Cosmetics review specifically listed caffeine’s “lipolytic action in cellulitis” as a key documented application. The physical scrubbing further boosts local blood circulation. Effects are temporary and need consistent maintenance, but the underlying mechanism is real and well-documented in the literature.

    🍽 How to use it: Combine used grounds with a small amount of olive oil. Apply to thighs and affected areas using firm circular motions for 2–3 minutes before showering. Rinse thoroughly. A few times a week yields the best results.

    4

    💇 Scalp Scrub and Hair Treatment

    Coffee grounds exfoliate the scalp just as effectively as they exfoliate skin, removing product buildup and dead cells that weigh hair down. Caffeine has been studied for hair follicle stimulation — a 2007 study in the International Journal of Dermatology found it penetrated the hair follicle and counteracted testosterone-related suppression of follicle activity in vitro. The 2023 Cosmetics review listed “hair regrowth” among caffeine’s documented cosmetic applications.

    🍽 How to use it: Before shampooing, work a palmful of damp used grounds into your scalp with your fingertips for 60 seconds. Rinse thoroughly, then shampoo as usual. Use once a week maximum — overuse can dry out the scalp. Works especially well for oily scalps or heavy product buildup.

    5

    🤲 Remove Stubborn Cooking Odors From Your Hands

    Garlic, fish, and onion leave sulfur-based odor compounds on skin that basic hand soap alone struggles to cut. Coffee grounds act as both a natural abrasive (lifting residue) and an odor binder — their porous structure adsorbs odor molecules the same way activated charcoal does. It’s the exact same principle used in commercial “stainless steel soap” bars.

    🍽 How to use it: After chopping garlic or handling fish, rub a small amount of used grounds between your palms for 30 seconds, then rinse and follow with soap. Works best while the odor is still fresh. Keep a small jar of dried grounds next to the kitchen sink — it’s the kind of trick you’ll use every week.

    🏠 Using Coffee Grounds Around the House

    The abrasive texture, odor-absorbing properties, and natural pigment of coffee grounds make them surprisingly useful around the home.

    6

    🧼 Natural Kitchen Scrub

    The same gritty texture that makes grounds work on skin works just as well on greasy pans and baked-on kitchen grime. They’re abrasive enough to cut through grease without scratching most cookware, and completely free of the harsh chemicals in commercial scrubs.

    🍽 How to use it: Sprinkle a small amount of used grounds onto a damp cloth or sponge and scrub greasy pans or surfaces, then rinse well. Avoid stainless steel sinks — grounds leave brown staining. Also skip porous grout or unsealed stone. And never put grounds down a drain — they accumulate and cause clogs. See more chemical-free cleaning ideas in our DIY Natural Non-Toxic Cleaning Recipes.

    7

    🌬 Natural Odor Absorber

    Coffee grounds absorb odors through their porous structure and natural compounds that bind volatile odor molecules — the same principle behind activated charcoal. They work in the fridge, freezer, bathroom, shoes, gym bags, and cars. The key step most people miss: dry the grounds completely first. Wet grounds will go moldy within days and create a worse problem than the odor you’re trying to fix.

    🍽 How to use it: Spread used grounds on a baking sheet and air-dry for 24–48 hours at room temperature, or dry in a low oven (200°F / 93°C) for 20 minutes. Once fully dry, place in a small open bowl in the fridge, or fill a breathable sachet or old sock for shoes and bags. Replace every 2–3 weeks when the coffee scent fades.

    8

    🪵 Conceal Minor Scratches on Dark Wood Furniture

    Coffee grounds mixed with a small amount of water form a rich brown paste that deposits natural pigment into surface scratches on dark wood. The oils in the grounds condition the surrounding wood at the same time — which is why this tends to look more natural than marker touch-ups for minor dings and surface marks.

    🍽 How to use it: Mix grounds with just enough water to make a thick paste. Rub into the scratch with a cotton swab, leave 5–10 minutes, then wipe away excess. Repeat for deeper scratches. Always test on a hidden area first — this works best on medium to dark wood and can noticeably darken lighter finishes.

    9

    🪣 Tame Dusty Fireplace Ash When Cleaning

    Cleaning fireplace ash is notoriously messy — the particles are so fine and light that the smallest movement sends them billowing through the room. Scattering damp coffee grounds over the ash before you start binds the fine particles together and weighs them down, making the entire job dramatically less dusty and easier to contain.

    🍽 How to use it: Scatter damp (not soaking) used grounds evenly over the ash and let them sit for a minute before scooping. Remove the bound mixture with a fireplace shovel as usual. The result is far easier to bag and dispose of cleanly.

    10

    🎨 Natural Dye for Paper, Fabric, and Art Projects

    Strong brewed coffee and used grounds stain paper, fabric, and untreated wood a warm sepia-brown — the same effect you see in vintage documents and aged craft projects. The color is not colorfast on fabric (it will fade with washing), but for paper crafts, aged journaling paper, gift wrapping, and mixed-media art it creates a beautiful, completely free natural dye.

    🍽 How to use it: For paper: brew a very strong cup using extra grounds, let it cool, then brush or pour over paper and let dry flat. Repeat for deeper color. For fabric: simmer grounds in water for 30 minutes, strain, soak pre-wetted fabric in the dye bath. For art: mix dry grounds into paint for earthy texture or press into damp clay.

    11

    🐾 Neutralize Pet Accident Odors on Hard Floors

    After cleaning a pet accident on a hard floor, residual odor molecules can linger in the surface. Dried coffee grounds placed briefly over the cleaned area can adsorb those remaining compounds — acting similarly to baking soda — before a final wipe-down.

    ⚠ Safety warning: Coffee grounds are toxic to dogs and cats if ingested. Even small amounts can cause caffeine poisoning. Only use on hard floors you can wipe completely clean immediately before pets access the area. Never use on carpets or anywhere a pet can sniff or lick. If your pet ingests coffee grounds, contact your vet or ASPCA Animal Poison Control immediately.

    🌱 Using Coffee Grounds in the Garden

    📢 A note on garden myths: A lot of popular advice overstates what coffee grounds can do in the garden. The most rigorous science on this topic comes from Dr. Linda Chalker-Scott’s WSU Extension Fact Sheet (FS207E) — peer-reviewed research we reference throughout this section. Her findings are more conservative than most gardening blogs, and more accurate.

    12

    🌿 Add to Your Compost Pile

    Composting is the single best and most evidence-backed use for coffee grounds in the garden. Grounds are nitrogen-rich — proteins make up over 10% of their content by weight — classifying them as a “green” material that feeds microorganisms and accelerates decomposition. According to Dr. Chalker-Scott’s WSU Extension research, properly composted grounds provide nitrogen, phosphorus, iron, and zinc to the finished soil. They also bind pesticide residues and heavy metals like cadmium, preventing their movement into surrounding plants and environment.

    ⚠ Two important caveats: First, fresh unbrewed grounds are phytotoxic — multiple peer-reviewed studies confirm they inhibit plant growth. Always use spent grounds from brewing. Second, thick layers of grounds compact into a water-repellent crust (per WSU research) that harms plants. Never use as thick stand-alone mulch.
    🍽 How to use it: Add used grounds to your compost bin daily as a green (nitrogen) material. Balance with brown materials — dried leaves, shredded newspaper, cardboard, wood chips, or straw. Aim for grounds to be no more than roughly 20% of total compost volume.

    13

    🐛 Feed Earthworms and Improve Soil Structure

    One of the best-documented benefits of coffee grounds in the garden is earthworm activity. WSU Extension’s FS207E cites research showing that earthworms are voracious consumers of coffee grounds, pulling them deeper into soil — which directly improves soil structure through increased aggregation. As grounds break down, they also produce humic substances that are important chemical and structural components of healthy soil. Additionally, Dr. Chalker-Scott’s research confirms that coffee grounds increase the availability of essential plant nutrients — nitrogen, phosphorus, iron, and zinc — particularly in more alkaline soils.

    ⚠ A note on pest control claims: You may have read that coffee grounds repel slugs, ants, or cats. WSU Extension’s peer-reviewed fact sheet explicitly states there is currently no published scientific evidence that grounds repel or kill any garden pests. Treat that claim with skepticism — the composting and earthworm benefits are the real, evidence-backed story.
    🍽 How to use it: Work used grounds lightly into the top inch of garden soil around plants, or add them to a worm composting bin. Worm bins thrive with a small addition of grounds weekly — but don’t overdo it, as high concentrations can affect worm health. Aim for grounds to be one ingredient among many.

    14

    🦟 Discourage Mosquito Breeding in Standing Water

    A 2015 study published in Parasites and Vectors found that female mosquitoes avoided laying eggs in water treated with coffee grounds, and that hatching rates were significantly lower when they did. This is a legitimate, research-backed use — with one important clarification.

    ⚠ Be precise about what this does: The research confirms grounds deter mosquito egg-laying in standing water. There is currently no peer-reviewed evidence that coffee grounds repel adult mosquitoes from biting people — despite what many viral posts claim.
    🍽 How to use it: Add a tablespoon of used grounds to birdbaths, drainage saucers, or decorative containers in your yard to discourage mosquitoes from using those spots as breeding grounds. Replace weekly or after rain.

    15

    🍄 Grow Oyster Mushrooms at Home

    Spent coffee grounds are one of the best substrates for growing oyster mushrooms at home — and this is backed by solid mycological research. A study published in Acta Biotechnologica confirmed that spent coffee grounds support good yields of Pleurotus ostreatus (oyster mushrooms) in solid-state fermentation. Grounds are already partially sterilized by the brewing process, nutritionally dense, and at the right moisture level for mycelium. You can grow a full harvest in a used takeaway container on a kitchen counter.

    🍽 How to use it: Collect grounds daily in a sealed container in the fridge to prevent mold. Once you have 1–2 lbs, mix with oyster mushroom spawn (available from online suppliers). Pack into a container with small air holes, keep in a cool shaded spot, and mist twice daily. Expect fruiting in 2–3 weeks. Then use them in our Gluten-Free Stuffed Mushrooms recipe!

    🍳 Using Coffee Grounds in the Kitchen

    Coffee’s bitter, roasted depth is one of the most underused flavor enhancers in home cooking. If you haven’t tried cooking with grounds yet, start here.

    16

    🥩 Dry Rub for Ribs, Steak, and Chicken

    Coffee is a genuinely excellent addition to dry rubs. Its slightly bitter, roasted depth pairs beautifully with smoky, spiced flavors, and its mild acidity works as a natural meat tenderizer. If you’ve enjoyed a coffee-rubbed brisket at a BBQ restaurant, now you know how to do it at home.

    🍽 Recipe starter: Combine 2 tbsp finely ground used coffee, 1 tbsp brown sugar, 1 tbsp smoked paprika, 1 tsp each of garlic powder, onion powder, black pepper, and salt, and a pinch of cayenne. Rub generously over the meat and refrigerate at least 30 minutes before cooking. Try it on our Easy Cajun-Style BBQ Ribs — the coffee rub pairs brilliantly with Cajun seasoning.

    17

    ☕ Add Depth to BBQ Sauce

    Coffee deepens the complexity of BBQ sauce the same way it deepens chocolate — amplifying and rounding existing flavors without making anything taste like a latte. The bitterness balances sweetness beautifully, and the roasted notes add a smoky dimension that’s hard to achieve any other way.

    🍽 How to use it: Stir 3–4 tablespoons of finely ground used coffee into ⅓ cup of your favorite BBQ sauce. Let sit for 20 minutes so the grounds steep and infuse, then baste onto ribs or chicken. Works brilliantly with our Easy Cajun-Style BBQ Ribs. Start with less and build to taste.

    18

    🍫 Intensify Chocolate Flavor in Baked Goods

    A small amount of finely ground coffee in baking doesn’t make things taste like coffee — it makes chocolate taste more chocolatey. The bitter, roasted compounds in coffee interact with cocoa’s flavor compounds to deepen and round them. It’s one of the oldest professional baking tricks, and it works whether you use espresso powder or finely ground used coffee.

    • Brownies and chocolate cake: Add 1–2 teaspoons to the dry ingredients. The difference in depth is noticeable.
    • Mocha cookies and oatmeal cookies: A teaspoon adds a subtle roasted complexity that elevates the whole cookie.
    • Chocolate frosting or ganache: Steep a teaspoon of grounds in warm cream for 5 minutes, then strain and use as usual.
    ⚠ Grind size matters: Only use finely ground used coffee in baking. Coarse grounds (from a French press or percolator) create an unpleasant gritty texture. Pulse briefly in a spice grinder before adding to any recipe.

    19

    🍝 Substitute for Instant Coffee or Espresso Powder in Recipes

    Many recipes call for instant coffee or espresso powder — things most home cooks don’t keep stocked. Finely ground used coffee is a direct substitute in most cooking applications. The flavor will be slightly less concentrated than instant espresso powder, so use a touch more and adjust to taste.

    🍽 Works well in: Tiramisu, mocha frosting, coffee-flavored whipped cream, chocolate sauces, glazes, and marinades for beef. For liquid-based applications — tiramisu, cocktails — brewed coffee from the same used grounds works even better than the dry grounds themselves.

    📦 How to Store Used Coffee Grounds (So They Don’t Go Moldy)

    20

    The Right Storage Approach for Every Use

    Wet grounds go moldy within 2–3 days at room temperature. The right storage method depends entirely on what you plan to use them for:

    • For immediate use — scrubs, cooking, scalp treatment: Use grounds from today’s or yesterday’s brew. Store in an open container in the fridge and use within 3 days.
    • For deodorizing (fridge, shoes, bags): Dry completely first. Spread on a baking sheet at room temperature for 24–48 hours, or bake at 200°F / 93°C for 20 minutes. Store in a sealed jar once dry — keeps for several weeks.
    • For composting: Add to the bin daily. Worms and microorganisms love moist grounds — no drying needed.
    • For mushroom growing: Refrigerate in a sealed container and use within 4–5 days before mold sets in.
    💡 Pro tip: Keep a small open jar next to your coffee maker. Add each day’s grounds loosely — don’t seal it tightly. A loose cover lets moisture escape and slows molding. Check every 3 days; if you see mold, discard and start fresh.

    ❓ Frequently Asked Questions About Coffee Grounds

    Are coffee grounds acidic? Will they lower my soil’s pH?

    This is the single most widespread myth about coffee grounds in the garden — and it is not accurate. Coffee is acidic, but the acids are water-soluble and mostly end up in your brewed cup, not the grounds. WSU Extension’s research by Dr. Chalker-Scott documented studies finding pH levels in used grounds ranging from mildly acidic to nearly alkaline, and notes the pH continues to shift as grounds decompose. Do not rely on them to acidify soil for plants like blueberries — get a proper soil test instead.

    Are coffee grounds safe for pets?

    No. Coffee grounds contain caffeine, which is toxic to both dogs and cats. Even small amounts can cause restlessness, rapid breathing, tremors, and in more severe cases, dangerous cardiac effects. Keep all uses well out of reach of pets. If your pet ingests coffee grounds, contact your vet or ASPCA Animal Poison Control immediately.

    Do coffee grounds repel mosquitoes?

    Partially — but not in the way most people think. A 2015 study in Parasites and Vectors confirmed that grounds in standing water deter female mosquitoes from laying eggs and suppress hatching when they do. There is no peer-reviewed evidence that grounds repel adult mosquitoes from biting people. Use grounds to treat standing water in your yard — not as a personal insect repellent.

    Can you reuse coffee grounds a second time for brewing?

    For brewing, no. Used grounds have given up most of their soluble flavor compounds and will produce a weak, flat, overly bitter cup. For every other use in this article, they work perfectly well. You can also steep them a second time to make a very weak coffee concentrate that works as a natural dye or a rinse for dark hair.

    Can I put coffee grounds directly on garden soil as mulch?

    This is where most garden blogs go wrong. According to WSU Extension, applying grounds directly as a thick mulch layer is not recommended — the fine texture compacts easily, forming a hydrophobic crust that repels water and harms roots. The correct approach: always compost them first, or apply as a very thin surface layer (no more than half an inch) and cover immediately with a thicker layer of coarse organic mulch like wood chips.


    ☕ The Bottom Line

    Used coffee grounds are one of the most consistently wasted household by-products. Whether you’re treating your skin, seasoning a steak, building better compost, or growing mushrooms for dinner — there’s almost always a better place for them than the bin.

    The best way to start is to pick just one idea and try it this week. Set a bowl of dried grounds in your fridge tonight, or save tomorrow morning’s grounds for a body scrub. Once you see how well they work, finding uses becomes second nature.

    ☕ Which of these are you trying first? Drop it in the comments below — we’d love to know!

    🍽 More From Better Living You Might Love

    The post 20 Useful Ways To Reuse Coffee Grounds appeared first on Better Living.

  • 15 Genius Ways to Use Up Extra Jelly

    🍇 What Can You Do With Extra Jelly?

    Extra jelly is one of the most versatile pantry rescues in the kitchen. Use it to glaze ham, make homemade BBQ sauce, swirl into ice cream, mix into cocktails, or create a two-ingredient salad dressing — all without any special equipment or extra shopping.

    ⚡ Quickest win: Add a splash of olive oil, a spoonful of mustard, and a splash of vinegar directly to a near-empty jelly jar, shake well, and you have an instant salad dressing with almost zero cleanup.

    📊 15 Ways to Use Extra Jelly at a Glance

    Use Category Best Jelly Flavor
    Thumbprint Cookies Sweet / Baking Any — tart flavors work best
    Homemade Pop-Tarts Sweet / Baking Strawberry, grape, raspberry
    Jelly Pancake Syrup Sweet / Breakfast Any fruit jelly
    Jelly Ice Cream Swirl Sweet / Frozen Raspberry, strawberry, blueberry
    Jelly-Glazed Ham Savory / Meat Pepper, apricot, or grape
    Jelly-Glazed Meatballs Savory / Meat Grape (classic)
    Spicy Jelly Wings Savory / Meat Pepper jelly or apricot
    Jelly-Stuffed Brie Savory / Cheese Fig, raspberry, or cranberry
    Jelly Vinaigrette Savory / Sauce Raspberry or strawberry
    Jelly BBQ Sauce Savory / Sauce Grape, peach, or pepper
    Jelly Stir-Fry Sauce Savory / Sauce Apricot, plum, or orange
    Jelly Cocktails Unexpected / Drinks Any — blackberry with bourbon
    DIY Fruit Leather Unexpected / Snack Any — mix flavors for fun
    Jelly-Glazed Vegetables Unexpected / Cooking Pepper, apricot, or raspberry
    Fix Runny Jelly Pantry / Rescue Any homemade jelly

    🍓 Sweet Ways to Use Up Extra Jelly

    1

    🍪 Jelly-Filled Pastries and Desserts

    A spoonful of jelly can turn simple baked goods into something that tastes bakery-worthy. These are the classics for a reason — and all of them are surprisingly simple to pull off at home.

    • Thumbprint Cookies: Press a well into buttery shortbread dough, fill with your favorite jelly, and bake. Tart jelly balances the sweetness of the cookie best.
    • Homemade Pop-Tarts: Layer jelly between two sheets of pastry dough, crimp the edges, bake, and drizzle with a simple glaze. Genuinely better than the box.
    • Jelly-Filled Croissants: Slice store-bought croissants, spoon in a generous amount of jelly, and warm briefly in the oven for a fruity morning pastry with almost zero effort.
    • Swiss Roll Cake: Spread a thin layer of jelly over a flat warm sponge cake, roll carefully, and slice for an impressive dessert. Our Peaches, Honey and Wine Glazed Ham uses the same sweet-layering approach on the savory side.
    • Crumb Bars: Jelly is a perfect filling for shortbread crumble bars. Strawberry and raspberry are classic, but apricot and grape work equally well.
    💡 Pro Tip: Slightly tart jelly works best in baked goods so the final result is not overwhelmingly sweet. Raspberry, blackberry, and sour cherry are ideal picks.

    2

    🥞 Breakfast Upgrades

    Put down the maple syrup for a minute. Jelly opens up a lot of territory for the most important meal of the day — and most of these take under two minutes to execute.

    • Jelly Pancake Syrup: Melt two tablespoons of jelly with a splash of water in a small saucepan over low heat, stirring until smooth. Pour warm over pancakes, French toast, or waffles.
    • Jelly-Infused Granola Bars: Stir a tablespoon of jelly into your granola bar mix before pressing and chilling. It acts as a natural binder and adds a subtle fruitiness throughout.
    • Jelly-Stuffed Bagels: Spread jelly inside a halved bagel before toasting so it caramelizes slightly. Pair with cream cheese for a warm, gooey combination.
    • Stirred Into Oatmeal or Yogurt: One spoonful swirled into plain oatmeal or Greek yogurt transforms breakfast in about three seconds flat.

    3

    🍦 Ice Cream and Frozen Treats

    Jelly is essentially a ready-made fruit sauce — the right consistency for swirling, drizzling, and blending straight from the jar. No cooking required.

    • Jelly Ice Cream Swirl: Soften a pint of vanilla ice cream slightly, ribbon in two to three tablespoons of jelly, and refreeze for a DIY ripple effect that looks far more impressive than the effort involved.
    • Jelly Popsicles: Blend jelly with fruit juice and a squeeze of lemon, pour into molds, and freeze overnight. Two ingredients, zero added sugar, genuinely refreshing.
    • Jelly Milkshakes: Add a heaping tablespoon of jelly to a vanilla or strawberry milkshake. It blends in smoothly and deepens the fruit flavor far better than flavored syrup.

    🍖 Savory Ways to Use Jelly

    This is where jelly really surprises people. Sugar is one of the key building blocks of savory cooking — it balances acidity, promotes caramelization, and rounds out spice. Jelly does all of that while adding a layer of fruit flavor that elevates the whole dish.

    Here are the best savory uses for extra jelly — including a few combinations that will genuinely surprise you.

    4

    🥩 Meat and Cheese Pairings

    • Jelly-Glazed Ham: Mix jelly with a spoonful of Dijon mustard and a splash of soy sauce, then brush onto a spiral ham during the last 30 minutes of baking. Pepper jelly, apricot, and grape all work beautifully — the sugars caramelize into a sticky crust with real depth. Our Peaches, Honey and Wine Glazed Ham uses this same layering technique to brilliant effect.
    • Jelly-Glazed Meatballs: Combine equal parts jelly and BBQ sauce in a slow cooker, add cooked meatballs, and simmer on low. Grape jelly is the undisputed classic choice for this party staple.
    • Spicy Jelly Wings: Toss baked or fried chicken wings in a sauce made from two parts jelly to one part hot sauce. The jelly creates a glossy, sticky coating that clings to every piece.
    • Jelly-Stuffed Brie: Score the top of a brie wheel, fill generously with jelly, wrap in puff pastry, and bake at 375°F for about 20 minutes until golden. Serve with crackers and watch it disappear.
    🍽 Best jelly for meat glazes: Pepper jelly is the top pick for savory glazes because its mild heat balances the sweetness. Apricot works especially well with pork. Grape is the classic for meatballs.

    5

    🥪 Sandwich and Snack Enhancements

    • Gourmet Ham and Jelly Sandwich: Layer sliced ham, creamy goat cheese, and a smear of jelly on crusty bread with a handful of peppery arugula. Salty, creamy, sweet, and bitter — genuinely next-level.
    • Jelly and Cheese Crackers: Skip the jam at your next charcuterie board. Sharp cheddar, brie, and blue cheese all pair wonderfully with jelly. Pepper jelly with cream cheese is a particular crowd favorite.
    • Jelly-Infused Vinaigrette: Whisk one tablespoon of jelly with three tablespoons of olive oil, one tablespoon of balsamic or apple cider vinegar, and a pinch of salt. It emulsifies easily and adds a fruity sweetness that works beautifully over spinach or arugula. Try it on our Strawberry Pecan Salad.
    • Goat Cheese Grilled Cheese: Spread jelly on the outside of your bread alongside butter before grilling. Layer goat cheese or brie inside for a sweet-and-savory combination that completely reinvents the classic.

    6

    🔥 Sauces, Glazes, and Marinades

    • Jelly BBQ Sauce: Combine half a cup of jelly with a quarter cup of ketchup, two tablespoons of apple cider vinegar, a teaspoon of Worcestershire sauce, and a pinch of smoked paprika. Simmer five minutes. It pairs beautifully with our Easy Cajun-Style BBQ Ribs.
    • Jelly Stir-Fry Sauce: Whisk two tablespoons of jelly with two tablespoons of soy sauce, one minced garlic clove, and a splash of sesame oil. Quick glaze that works on chicken, shrimp, tofu, or vegetables.
    • Jelly Marinade: Mix jelly with equal parts Dijon mustard and a splash of olive oil for an overnight marinade for pork tenderloin or chicken thighs. The sugar promotes beautiful caramelization on the grill or in the oven.
    • Jelly Gravy Booster: Stir a teaspoon of jelly into pan drippings or store-bought gravy. Add a little at a time — it rounds out the saltiness without making the gravy taste sweet.

    ⚡ Unexpected Ways to Use Jelly

    7

    🍹 Drink Enhancements

    Jelly dissolves easily into liquid, making it a surprisingly versatile bar ingredient and everyday drink booster. It essentially functions as a flavored simple syrup — no cooking required.

    • Jelly-Infused Cocktails: Add a teaspoon of jelly directly to a cocktail shaker with ice. It works beautifully in margaritas, whiskey sours, and gin fizzes — anywhere you would normally reach for simple syrup but want a fruit flavor instead.
    • Jelly Lemonade: Stir one tablespoon of jelly into a glass of lemonade instead of simple syrup. It sweetens and adds fruit flavor that makes it feel like a specialty drink.
    • Jelly Tea Fusion: Dissolve a spoonful into hot tea or stir into iced tea for a flavored, lightly sweet drink. Try it as a base with our Cold Brewed Peach Mint Iced Tea.

    8

    🎯 DIY Fruit Leather, Baking Hacks, and More

    If you have a larger amount to work through, homemade fruit leather is one of the most satisfying uses. Kids love it, it keeps for two weeks, and the cleanup is minimal.

    Spread jelly in a thin, even layer across a parchment-lined baking sheet. Bake at 175°F for three to four hours until the surface is no longer sticky. Cool completely, peel off the parchment, cut into strips, and roll them up.

    • Jelly as a Sugar Substitute: Swap granulated sugar for jelly at a three-quarters ratio — three tablespoons of jelly per quarter cup of sugar. Reduce other liquids slightly to compensate for the added moisture.
    • Jelly-Glazed Roasted Vegetables: Toss roasted carrots, Brussels sprouts, or butternut squash with a tablespoon of jelly in the final five minutes of roasting for a caramelized, lacquered finish — similar to the technique in our Roasted Brussels Sprouts with Balsamic and Bacon.
    • Jelly Dipping Sauce: Mix jelly with a splash of soy sauce and a squeeze of lime for an instant dipping sauce for egg rolls, spring rolls, or chicken tenders.
    🌿 Fruit leather tip: Mix two or more jelly flavors together before spreading. Strawberry and peach is a particularly good combination, and it uses up two jars at once.

    9

    🔧 Fixing Runny Jelly

    If you made a batch of homemade jelly that never properly set, there is no need to throw it out. Runny jelly can be rescued with a quick recook.

    Measure the jelly and return it to a saucepan. For every four cups of jelly, add one tablespoon of fresh lemon juice and one package of powdered pectin. Bring to a hard boil, stir in another three-quarters cup of sugar, and boil hard for one full minute. Ladle into clean jars and let cool — it will set as it returns to room temperature.

    ✏ Alternatively: Embrace the runny jelly for what it is. It works perfectly as a syrup, cocktail mixer, glaze, or salad dressing base without any adjustment needed.

    ❓ Frequently Asked Questions About Jelly

    Can I use jelly in place of jam in recipes?

    Yes. In most recipes jelly and jam are interchangeable. The main difference is texture — jelly is smooth and clear, jam contains fruit pieces. For glazes, sauces, drinks, and baked goods, either works without adjustment.

    What is the best jelly flavor for glazing meat?

    Pepper jelly is the top choice for savory glazes because its mild heat balances the sweetness. Apricot works especially well with ham and pork. Grape is the undisputed classic for meatballs. Any fruit jelly will work — just pair the flavor intentionally with your protein.

    How long does open jelly last in the refrigerator?

    Once opened, store-bought jelly typically lasts 1 to 3 months in the refrigerator, depending on sugar content and how it is stored. Sugar-free or low-sugar varieties spoil faster because sugar acts as a natural preservative. Always check for mold, off smells, or texture changes before using. We cover all the signs of spoilage in our full guide: Does Jelly Go Bad?

    Does jelly need to be refrigerated after opening?

    Yes. Once opened, jelly should go in the refrigerator. Commercial brands recommend refrigeration after opening to slow yeast and bacterial growth. Full details in our guide: Does Jelly Need to Be Refrigerated?

    Can jelly be frozen?

    Yes. Transfer to a freezer-safe container with an inch of headspace and freeze for up to 12 months. Thaw overnight in the refrigerator. The texture may soften slightly but the flavor stays fully intact.

    What can I do with a tiny bit of jelly left in the jar?

    Add a splash of olive oil, a splash of vinegar, a dollop of mustard, and a pinch of salt directly to the jar, put the lid on, and shake hard. Instant salad dressing with almost zero cleanup. Or add a small pour of bourbon or gin, a squeeze of citrus, and some ice for a jar cocktail that makes cleanup genuinely fun.


    🍇 The Bottom Line

    Jelly is one of the most versatile ingredients in your kitchen, and toast is honestly selling it short. Whether you are glazing a holiday ham, mixing a cocktail, pulling together a last-minute salad dressing, or baking a batch of crumb bars, there is a perfect use for every flavor and every last spoonful.

    The next time you find yourself staring at a nearly empty jar, skip the trash. Reach for the recipe instead.

    🍓 Which of these ideas are you trying first? Drop it in the comments — we want to know!

    🍽 More Recipes You Might Love

    The post 15 Genius Ways to Use Up Extra Jelly appeared first on Better Living.

  • Does Anchovy Paste Go Bad? Shelf Life, Spoilage Signs & Storage Tips

    Does anchovy paste go bad? Yes, eventually — but it takes a very long time.

    Anchovy paste is heavily salted, and that salt concentration acts as a powerful natural preservative. An unopened tube or jar keeps easily for 1 to 2 years at room temperature. Once opened and refrigerated, it holds good quality for up to a year.

    The main reason people throw out perfectly good anchovy paste is misreading normal changes — like oil separation or slight darkening at the tube tip — as spoilage. They are not.

    Real spoilage in anchovy paste is easy to identify once you know what you are actually looking for. Smell is your most reliable indicator.

    For the refrigeration question specifically, see: Does Anchovy Paste Need to Be Refrigerated? For a full condiment storage reference, visit the Food Storage Guide.

    ⚡ Short Answer

    Yes, anchovy paste goes bad — but not quickly. Unopened, it lasts 1 to 2 years in the pantry. Once opened and refrigerated, expect good quality for 6 to 12 months. Real spoilage signs are a sour or rancid smell, visible mold, or a deeply darkened color. Oil pooling on the surface and slight tip discoloration are completely normal and not signs of spoilage.

    🤔 Why Anchovy Paste Lasts So Long

    Anchovy paste starts with salt-cured anchovies — fish that have already been preserved through an intensive salting and fermentation process before they are ground into paste. Salt is added again during processing. The result is a product with an exceptionally high sodium concentration, often 700 to 1,000 mg per tablespoon, that creates a genuinely hostile environment for the bacteria that cause spoilage.

    This is the same preservation logic behind fish sauce, Worcestershire sauce, and other heavily salted fermented fish products. The salt does not just add flavor — it is what keeps the paste shelf-stable for long periods without refrigeration when sealed.

    The olive oil in the paste adds a secondary layer of protection: when present in enough quantity, it coats the surface of the paste and limits oxygen exposure, which slows oxidation and rancidity.

    💡 Tube vs. jar

    Anchovy paste in a tube stays fresh longer after opening than paste in a jar. A tube seals back down after each use with minimal air exposure — only the paste near the tip contacts air. A jar exposes the entire surface every time you open it. If you have paste in a jar, add a thin layer of olive oil to cover the surface after each use. It limits oxidation and extends quality.

    🕓 Anchovy Paste Shelf Life at a Glance

    Storage Situation How Long It Lasts
    Unopened tube or jar — pantry 1 to 2 years; often good past best-by date
    Opened tube — refrigerated 6 to 12 months; squeeze out air before sealing
    Opened jar — refrigerated 6 to 12 months; add oil layer to cover surface

    The USDA FSIS confirms that best-by dates on shelf-stable products indicate peak quality, not a safety cutoff. Anchovy paste that is a few months past its printed date and shows no spoilage signs is almost certainly fine.

    🔍 How to Tell If Anchovy Paste Has Gone Bad

    Smell is the most reliable test — anchovy paste tells you clearly when something is wrong. Work through the following checklist before using a tube or jar that has been sitting for a while.

    🔴 Toss It

    Sour, rancid, or putrid smell. Fresh anchovy paste smells intensely fishy, briny, and savory — not pleasant on its own, but distinctly anchovy. If the smell has shifted to sour, rancid, or outright rotten, the paste has deteriorated. This is the clearest single sign that it is done. Trust your nose completely here.

    Visible mold. Any fuzzy or spotted growth — white, blue, green, or black — on the surface of the paste or inside the tube means the whole tube or jar goes. Mold in a heavily salted product is uncommon but not impossible, usually from contamination via a wet utensil or leaving the lid off for extended periods.

    Deep, dramatic darkening throughout. Anchovy paste is naturally a grayish-brown to reddish-brown color. If the paste has shifted to a very dark brown or near-black throughout, that is a sign of significant oxidative deterioration. A slight darkening in color alone is not dangerous, but combined with an off smell, discard.

    Dry, crumbly, or completely separated texture that cannot be stirred. Paste that has dried out to a hard, crumbly consistency or separated so completely that it cannot be combined back together has lost its usable quality and should be discarded.

    🟢 Completely Normal — Keep It

    Oil pooling on the surface. This is the most common reason people discard perfectly good anchovy paste. Olive oil naturally separates from the denser fish paste over time, especially after sitting in the fridge. It pools at the top of the jar or collects near the tube opening. This is completely normal — just stir it back in before using. It is not a spoilage sign.

    Slight discoloration at the tube tip. The paste right at the opening of a tube is exposed to air every time you use it. A small amount of darkening or slight dryness at the very tip is normal oxidation in a tiny area. Squeeze past the tip and discard the first quarter inch. Everything below is fine.

    Visible salt crystals. White crystalline deposits on the paste or inside the jar are salt crystallizing out of solution, particularly in cold temperatures. This is harmless — the crystals dissolve back in during cooking.

    Stronger smell after sitting a while. Aged anchovy paste can smell more intensely fishy or fermented than a fresh tube. Intensity alone is not spoilage. The question is whether the smell has gone wrong — sour, rancid, or putrid — not just strong.

    🧪 Quick smell test

    Open the tube or jar and smell before using. Fresh anchovy paste smells like concentrated, savory, briny fish. If it smells like that — even intensely — it is fine. If it smells sour, rancid, or like something actively rotting, it is done. That distinction is almost always obvious.

    ⚡ What Speeds Up Spoilage

    Wet or contaminated utensils. Dipping a wet spoon or a utensil that has touched other food into the jar introduces bacteria and moisture. Always use a clean, dry spoon. For tubes, squeeze directly — no utensils needed.

    Leaving the cap off. Air exposure is the primary driver of oxidation and quality loss after opening. Cap the tube or jar immediately after every use.

    Storing opened paste at room temperature. Anchovy paste can survive briefly at room temperature, but consistent pantry storage of an opened tube or jar significantly shortens quality life. Once opened, it goes in the fridge.

    Not squeezing air out of the tube. Each time you use a tube, roll the empty end up toward the opening and squeeze out as much air as possible before capping. Less air inside means slower oxidation.

    Temperature fluctuations. Moving the jar in and out of the fridge repeatedly, or storing it in the warmest part of the fridge (the door), accelerates degradation. Store in the main body of the fridge where the temperature is most consistent.

    🧊 Quick Storage Rules

    • Unopened: cool, dark pantry — away from the stove, out of direct sunlight. Shelf-stable for 1 to 2 years.
    • Opened: refrigerator — main body, not the door. Cap tightly after every use.
    • Tubes: squeeze out air before recapping. Roll the empty end toward the opening.
    • Jars: add an oil layer after each use. A thin coating of olive oil over the surface limits oxidation.
    • Always use a clean, dry utensil or squeeze directly from the tube. No wet spoons, no cross-contamination.
    • Write the opening date on the tube — helps you track the 6-to-12-month window.

    🍽 Using Up That Tube

    Anchovy paste is one of the most versatile umami boosters in the kitchen. A small squeeze disappears into a dish completely, adding savory depth without any fishy taste:

    ❓ Frequently Asked Questions

    How long does anchovy paste last after opening?

    Opened and refrigerated anchovy paste keeps good quality for 6 to 12 months. Tubes typically last toward the higher end because they limit air exposure. Jars expose more surface area and may decline a little faster — adding a layer of olive oil after each use extends them considerably.

    Is the oil separation in anchovy paste normal?

    Yes, completely. Olive oil naturally separates from the denser fish paste over time, especially in cold temperatures. It pools on top of a jar or collects near the tube opening. This is not spoilage — just stir it back in before using. The paste below is fine.

    What does spoiled anchovy paste smell like?

    Spoiled anchovy paste smells sour, rancid, or outright rotten — very different from the intensely fishy and savory smell of fresh paste. The distinction is clear in practice. Fresh anchovy paste smells strong; spoiled anchovy paste smells wrong.

    Can you eat anchovy paste past the expiration date?

    Often yes, if it has been stored properly and shows no spoilage signs. The USDA FSIS clarifies that best-by dates indicate peak quality rather than a safety cutoff. Check smell, color, and texture. If all three are fine, the paste is almost certainly still good.

    Can you freeze anchovy paste?

    Technically yes, though it is generally not necessary given the long refrigerated shelf life. Freezing can alter texture slightly. If you do freeze it, portion it into small amounts — an ice cube tray works well — so you can thaw only what you need. Use frozen anchovy paste in cooked applications where the texture change will not matter.

    Does anchovy paste need to be refrigerated?

    Unopened, no — it is shelf-stable in the pantry. Once opened, refrigeration is strongly recommended. Full breakdown: Does Anchovy Paste Need to Be Refrigerated?

    Is discoloration at the tip of the tube a problem?

    No. The paste at the very tip of an open tube is exposed to air every time you use it and oxidizes slightly. A small amount of darkening or dryness at the tip is normal. Squeeze and discard the first quarter inch — everything below is unaffected and perfectly fine to use.

    How much anchovy paste equals one anchovy fillet?

    The standard conversion is about half a teaspoon of anchovy paste per anchovy fillet. Anchovy paste is more concentrated than whole fillets because it is ground with added salt and oil, so start conservatively and adjust to taste.

    Does anchovy paste make food taste fishy?

    Not when used in small amounts in cooked dishes. Anchovy paste melts completely into sauces, stews, and dressings when heated, leaving behind pure savory umami depth with no detectable fishy flavor. It is one of the best secret ingredients in Italian and Mediterranean cooking for exactly this reason.

    📚 Related Posts

    Sources: USDA FSIS — Food Product Dating | USDA FSIS — Shelf-Stable Food Safety

    The post Does Anchovy Paste Go Bad? Shelf Life, Spoilage Signs & Storage Tips appeared first on Better Living.

  • Does Anchovy Paste Need to Be Refrigerated? Full Storage Guide

    Does anchovy paste need to be refrigerated? Unopened anchovy paste does not need refrigeration. A sealed tube or jar is shelf-stable and keeps well in a cool, dark pantry for 1 to 2 years. Once you open it, refrigeration is strongly recommended. The high salt content still offers protection at room temperature, but consistent cold temperatures keep quality significantly better for longer and slow the oxidation that degrades both flavor and color.

    How you store it after opening also depends on whether you have a tube or a jar — the two formats have different air exposure profiles and slightly different best practices.

    For full spoilage signs and a complete shelf life breakdown, see: Does Anchovy Paste Go Bad? For the full condiment storage picture, visit the Food Storage Guide.

    ⚡ Short Answer

    Unopened anchovy paste does not need to be refrigerated — pantry storage is fine for up to 1 to 2 years. Once opened, always refrigerate. Cap the tube tightly and squeeze out air before storing. For jars, add a thin layer of olive oil over the surface after each use. Opened and properly stored, anchovy paste stays at good quality for 6 to 12 months in the fridge.

    🤔 Why Unopened Anchovy Paste Does Not Need the Fridge

    Anchovy paste is a shelf-stable product when sealed. The extremely high salt concentration — typically 700 to 1,000 mg of sodium per tablespoon — creates an environment where spoilage bacteria cannot thrive. The sealed packaging eliminates oxygen exposure, which prevents oxidation. An intact tube or jar in a cool, dark pantry away from heat is well protected for up to 2 years.

    This is the same preservation logic behind fish sauce, Worcestershire sauce, and other heavily salted pantry condiments. The salt does the work. Refrigeration before opening adds nothing because the sealed environment is already doing its job.

    💡 Tube vs. jar — why it matters for storage

    A tube of anchovy paste seals back down after every use. Only the paste at the very tip contacts air, keeping oxidation minimal. A jar exposes the entire surface to air every time you open it — significantly more oxidation risk per use. Both need refrigeration after opening, but jar paste benefits more from the extra step of adding an olive oil layer over the surface to limit air contact.

    🧊 How to Store Anchovy Paste — Before and After Opening

    🟢 Unopened Tube or Jar

    Store in a cool, dark pantry away from the stove, dishwasher, and direct sunlight. Heat and light both degrade quality over time. Check the printed best-by date and use as a general guide — properly stored unopened paste is often fine past that date. Shelf life up to 1 to 2 years.

    🧊 Opened Tube

    Refrigerate immediately after first use. After each use, roll the empty end of the tube toward the opening and squeeze out as much air as possible before recapping. This minimizes oxygen inside the tube and slows oxidation significantly. Store in the main body of the fridge, not the door. Shelf life 6 to 12 months after opening.

    🧊 Opened Jar

    Refrigerate after opening. Always use a clean, dry spoon — never a wet utensil or one that has touched other food. After each use, smooth the surface of the paste flat and pour a thin layer of olive oil over it to seal out air before replacing the lid. This dramatically slows oxidation and extends quality. Store in the main body of the fridge. Shelf life 6 to 12 months after opening.

    🕓 Anchovy Paste Shelf Life by Storage Method

    Storage Situation How Long It Lasts
    Unopened tube or jar — pantry 1 to 2 years; often good past best-by date
    Opened tube — refrigerated 6 to 12 months; squeeze out air before capping
    Opened jar — refrigerated 6 to 12 months; add olive oil layer over surface
    Opened — room temperature pantry Not recommended; quality degrades significantly faster

    According to the USDA FSIS, best-by dates on shelf-stable products indicate peak quality rather than a safety cutoff. Anchovy paste that is past its printed date but stored properly and shows no spoilage signs is almost certainly still usable.

    ⚡ The Storage Habits That Actually Matter After Opening

    Anchovy paste is used a tiny bit at a time — a teaspoon here, half a teaspoon there. That means a single tube or jar can sit in your fridge for months between uses. These habits are what determine whether it is still good when you reach for it:

    • Cap the tube or lid immediately after every use. Air is the enemy. Every second the paste is exposed to air, oxidation is happening. Cap it before doing anything else.
    • Squeeze air out of tubes before recapping. Roll the empty end toward the opening and flatten it. This keeps oxygen from sitting against the paste between uses.
    • Add an olive oil layer in jars. A thin coating over the flat surface of the paste limits air contact dramatically. Use a clean spoon to smooth the paste flat first, then pour just enough oil to coat.
    • Use a clean, dry spoon every time. A wet utensil introduces moisture and bacteria. Cross-contamination from another food can introduce mold even in a high-salt environment.
    • Store in the main body of the fridge. The door is the warmest, most temperature-variable part of the fridge. The main shelf keeps a more consistent cold temperature.
    • Write the opening date on the tube or lid. Anchovy paste is used infrequently enough that it is easy to lose track. A date written in marker takes two seconds and tells you exactly where you stand.

    📋 What Happens If You Leave Opened Anchovy Paste at Room Temperature

    Taking the tube or jar out of the fridge to use it, then leaving it on the counter while you cook, is not a problem — the salt concentration protects it during brief room temperature exposure. If a tube was accidentally left out overnight once, it is almost certainly still fine. Check smell and appearance before using.

    Consistently storing opened anchovy paste at room temperature for weeks or months is a different matter. The salt inhibits bacterial growth but does not prevent oxidation, and warm temperatures accelerate rancidity in the olive oil component. Quality will decline noticeably, and the window to spoilage shortens. For a product used in small amounts over many months, the fridge is worth it.

    ❓ Frequently Asked Questions

    Does anchovy paste need to be refrigerated after opening?

    Yes. Once opened, refrigeration is strongly recommended for both tubes and jars. The salt still provides some protection at room temperature, but consistent refrigeration keeps quality significantly better for longer and slows oxidation. Opened and refrigerated, anchovy paste stays at good quality for 6 to 12 months.

    How long does anchovy paste last in the fridge after opening?

    6 to 12 months for both tubes and jars when stored with good habits — cap tightly, squeeze air from tubes, add an olive oil layer to jars, and always use a clean dry utensil. Tubes tend to last toward the higher end because they limit air exposure better than jars.

    Can anchovy paste be stored at room temperature after opening?

    Not recommended for long-term storage. The high salt concentration provides some protection, but oxidation of the olive oil component accelerates at room temperature and degrades flavor over time. Brief room temperature exposure during cooking is fine, but opened paste should go back in the fridge after each use.

    Do some anchovy paste tubes say to refrigerate before opening?

    Some brands, particularly European imports, are sold refrigerated at the store and may carry a “keep refrigerated” label even before opening. Follow the label in that case. Most standard shelf-stable tubes sold unrefrigerated in grocery stores are fine at pantry temperature until opened.

    How do I know if my anchovy paste has gone bad?

    Smell it first — fresh anchovy paste smells intensely fishy, briny, and savory. Spoiled paste smells sour, rancid, or outright rotten. Visually look for mold and dramatic darkening throughout (not just at the tip). Oil separation, slight tip discoloration, and salt crystals are all normal and not spoilage signs. Full guide: Does Anchovy Paste Go Bad?

    Can you freeze anchovy paste to extend shelf life?

    Yes, freezing is an option, though rarely necessary given the long refrigerated shelf life. Portion into small amounts — a silicone ice cube tray works well — so you can thaw only what you need. Frozen anchovy paste may have a slightly altered texture after thawing, making it best suited for cooked applications rather than raw dressings or spreads. Use within a few months of freezing.

    What is the best way to store an open tube of anchovy paste?

    Cap tightly and roll the empty end toward the opening to squeeze out air before refrigerating. Store in the main body of the fridge rather than the door. Write the opening date on the tube. With these habits, an open tube will hold quality for up to a year.

    🍽 Ways to Use Anchovy Paste More Often

    The best storage strategy is a tube you actually reach for. Anchovy paste adds instant depth to far more dishes than most people realize:

    • Red Lentil Soup — a half teaspoon stirred into the base makes the whole bowl taste richer and more complex
    • Scungilli Salad — classic Italian seafood salad that pairs naturally with the anchovy flavor profile
    • Easy Fresh Basil Pesto — anchovy paste is a traditional addition in some regional Italian pesto variations
    • Improve Gut Health — fermented and salt-cured fish products like anchovy paste are part of the broader gut-supporting fermented food picture

    📚 Related Posts

    Sources: USDA FSIS — Shelf-Stable Food Safety | USDA FSIS — Food Product Dating

    The post Does Anchovy Paste Need to Be Refrigerated? Full Storage Guide appeared first on Better Living.

  • Does Maple Syrup Go Bad? Everything You Need to Know

    Does maple syrup go bad? Yes — but very slowly, and almost always only after the bottle has been opened. Pure maple syrup has a remarkably long shelf life thanks to its extremely high sugar content and low water activity. An unopened bottle stored properly can last indefinitely. Once opened, it is vulnerable to mold if it is not refrigerated, and that mold is not something you can simply skim off and ignore.

    The other reason people throw out perfectly good maple syrup is misreading crystallization as spoilage. It is not. Here is exactly what to look for, how long maple syrup actually lasts, and how to store it correctly.

    For the refrigeration question specifically, see: Does Maple Syrup Need to Be Refrigerated? For a complete pantry reference, visit the Food Storage Guide.

    ⚡ Short Answer

    Yes, maple syrup goes bad — but unopened, it lasts indefinitely in a cool, dark pantry. Once opened and refrigerated, expect good quality for up to 1 year. The main spoilage risk is mold from improper storage at room temperature after opening. Crystallization is completely normal and not a spoilage sign. If you see mold, discard the entire bottle — do not skim and reheat.

    🤔 Why Maple Syrup Lasts So Long

    Pure maple syrup is made by boiling down the sap of sugar maple trees until it thickens and concentrates. The finished syrup is roughly 66% sugar — mostly sucrose — with about 33% water. That extremely high sugar concentration creates what food scientists call low water activity: there is simply not enough free water available for bacteria or most molds to grow and reproduce.

    This is the same preservation principle behind honey, molasses, and other high-sugar products. When sealed in an airtight container, maple syrup has no meaningful spoilage pathway. Unlike pancake syrup — which is typically artificially flavored corn syrup with added preservatives — pure maple syrup achieves its stability entirely through sugar concentration, with no additives.

    Once the seal is broken, moisture from the air can enter and dilute the surface layer of syrup, creating enough free water for mold spores to take hold. That is the entire spoilage story for maple syrup: not bacteria, not rancidity — mold, caused by moisture, caused by improper storage after opening.

    🕓 Maple Syrup Shelf Life at a Glance

    Storage Situation How Long It Lasts
    Unopened — cool dark pantry Indefinitely; best quality within 2–4 years
    Opened — refrigerated Up to 1 year
    Opened — freezer Indefinitely; does not freeze solid
    Opened — room temperature pantry Not recommended; mold risk increases significantly

    The USDA FSIS notes that best-by dates on shelf-stable products reflect peak quality rather than a safety cutoff. For unopened maple syrup, the best-by date is a quality guideline — the syrup may darken slightly and develop a stronger flavor over time, but it does not become unsafe.

    🔍 How to Tell If Maple Syrup Has Gone Bad

    🔴 Toss It

    Mold on the surface or rim. This is the primary spoilage sign for maple syrup. You may see a white, gray, or dark fuzzy film on the surface, or mold growing around the rim or inside the cap. If you see any mold, discard the entire bottle. Do not skim it off. Do not boil the syrup and continue using it. See the section below on why this matters.

    Sour, fermented, or alcoholic smell. A sour, yeasty, or alcohol-like smell means the syrup has fermented. Fermentation can occur when wild yeast enters an opened bottle stored at room temperature, especially if the syrup has been diluted by moisture from repeated opening. Discard it.

    Off or bitter taste. Maple syrup should taste smooth, rich, and distinctly maple. A sharp, bitter, or musty taste that is clearly different from the original flavor is a sign of deterioration. If it tastes wrong, trust your palate.

    🟢 Completely Normal — Keep It

    Crystallization. Sugar crystals forming at the bottom of the bottle or around the cap are the most common reason people throw out perfectly good maple syrup. Crystallization is a completely normal chemical process — sucrose molecules are simply settling into a crystalline structure over time. The syrup is not spoiled. To dissolve the crystals, place the bottle in warm water for a few minutes or microwave briefly without the lid. The syrup is fully usable.

    Color darkening. Maple syrup naturally darkens as it ages, particularly if stored in plastic or exposed to any light. A darker color is a quality change — the flavor may become more robust and caramel-forward — but it is not a spoilage sign on its own. Smell and taste are your real indicators.

    Thicker consistency in the fridge. Cold temperatures make maple syrup noticeably thicker and slower to pour. This is normal. It returns to its standard consistency at room temperature. This is not crystallization and not spoilage — just physics.

    ⚠ Why you cannot just skim the mold off

    Until the early 2000s, the standard advice was to skim mold from maple syrup, boil it for a few minutes, and continue using it. That guidance has changed. A 2014 study by researchers at the University of Maine found that certain molds growing in maple syrup can produce mycotoxins — toxic compounds that are not destroyed by boiling. The Vermont Maple Sugar Makers’ Association now recommends discarding the entire container if mold is present. When in doubt, throw it out.

    🤔 Real Maple Syrup vs. Pancake Syrup — Does Storage Differ?

    Yes, significantly. Pancake syrup — products like Mrs. Butterworth’s or Log Cabin — is typically corn syrup with artificial maple flavoring and chemical preservatives. These added preservatives extend shelf life and make them more forgiving of room temperature storage after opening. They are also less susceptible to mold.

    Pure maple syrup has no preservatives. Its shelf stability is entirely dependent on the sugar concentration when sealed and on refrigeration after opening. If your bottle says “pure maple syrup” and lists only maple syrup as an ingredient, it needs to be refrigerated after opening. If the ingredient list includes corn syrup, artificial flavors, or preservatives, it is a pancake syrup and follows different rules.

    🧊 How to Store Maple Syrup Properly

    • Unopened: cool, dark pantry. Away from the stove and out of direct sunlight. Glass bottles keep better than plastic over the long term. Shelf-stable indefinitely.
    • Opened: refrigerator immediately. Keep tightly sealed. Wipe the rim clean after each use — syrup residue around the cap can crystallize and eventually introduce contamination.
    • Large jugs: portion and freeze. Pour enough syrup for a few weeks into a small glass jar and refrigerate it for daily use. Store the rest of the jug in the freezer. Maple syrup does not freeze solid — the sugar content keeps it pourable even at freezer temperatures — and frozen syrup keeps indefinitely.
    • Best container: airtight glass. Glass does not absorb odors and is less permeable to oxygen than plastic over time. If you transferred syrup from a plastic jug to a glass jar, the glass will keep quality longer.
    • Avoid double-dipping. Using a syrup-coated spoon that has touched other food introduces contamination. Pour directly from the bottle or use a clean, dry spoon each time.

    🍂 Maple Syrup Grades — Does Grade Affect Shelf Life?

    All pure maple syrup in the US is now sold under a unified grading system: Grade A with four color/flavor designations — Golden (delicate taste), Amber (rich taste), Dark (robust taste), and Very Dark (strong taste). The grade reflects the time of season the sap was harvested and how the flavor has developed, not quality differences between them.

    Shelf life is the same across all grades. Darker grades have a more intense flavor that holds up slightly better to long storage, but the spoilage mechanisms and storage requirements are identical regardless of grade.

    🍽 Recipes to Use Up That Open Bottle

    The best storage strategy is a bottle you actually reach for. Maple syrup is far more versatile than just pancakes:

    ❓ Frequently Asked Questions

    Does maple syrup expire?

    Unopened pure maple syrup does not truly expire — it can last indefinitely when stored in a cool, dark place. Best-by dates on bottles indicate peak quality rather than safety, per the USDA FSIS. Once opened, refrigerate and use within a year for best quality.

    How long does maple syrup last after opening?

    Up to 1 year in the refrigerator. The key is keeping it sealed, refrigerated, and free from contamination. If you want to extend it further, the freezer keeps opened maple syrup indefinitely — it will not freeze solid and pours easily once it warms slightly.

    Can you eat maple syrup with mold?

    No. Discard the entire bottle. Research from the University of Maine published in 2014 showed that molds growing in maple syrup can produce mycotoxins that are not destroyed by boiling. The old advice to skim and reheat is no longer recommended by food safety authorities.

    What does crystallized maple syrup mean?

    Crystallization means sugar molecules have settled into a crystalline structure — it is a normal chemical process and not a spoilage sign. The syrup is perfectly safe. Warm the bottle gently in hot water or microwave briefly to dissolve the crystals. Quality is unaffected.

    Can maple syrup be frozen?

    Yes, and it is an excellent long-term storage method. The high sugar content prevents maple syrup from freezing solid — it thickens but remains pourable. Frozen maple syrup keeps indefinitely. For a large jug, pour off a few weeks’ worth into a small jar for the fridge and freeze the rest. Refill the small jar as needed.

    Does opened maple syrup need to be refrigerated?

    Yes. Pure maple syrup has no preservatives and will develop mold if left at room temperature after opening. Full storage breakdown: Does Maple Syrup Need to Be Refrigerated?

    Why did my maple syrup turn darker?

    Color darkening in storage is completely normal. It happens gradually over time through oxidation, and faster in plastic containers or when exposed to light — plastic is slightly permeable to oxygen, which speeds the process up. Darker syrup tends to have a more robust, caramel-forward flavor. It is not spoiled. Check smell and taste if concerned; color alone is not a reason to discard.

    What is the difference between maple syrup and pancake syrup?

    Pure maple syrup contains one ingredient: maple syrup. Pancake syrup is typically corn syrup with artificial flavoring and preservatives — it is not a maple product. Pure maple syrup requires refrigeration after opening; pancake syrup with added preservatives is more shelf-stable. If the label lists anything beyond maple syrup, it is not pure maple syrup.

    📚 Related Posts

    Sources: USDA FSIS — Food Product Dating | USDA FSIS — Shelf-Stable Food Safety | Branon Family Maple Orchards

    The post Does Maple Syrup Go Bad? Everything You Need to Know appeared first on Better Living.

  • Does Capers Go Bad? Everything You Need To Know.

    Does capers go bad? Yes, eventually — but capers are one of the most shelf-stable condiments you will ever open. The vinegar brine they live in is intensely acidic and salty, creating an environment genuinely hostile to most bacteria and mold. A jar of capers that has been sitting in your fridge for a year after opening is very likely still perfectly fine. The trick is knowing what actual spoilage looks like versus normal aging.

    Most people throw out capers that are still good because the brine has gone slightly cloudy or the color has faded. Most spoilage signs are visual and easy to read once you know what to look for. The brine is your best indicator — it tells you almost everything you need to know.

    For the refrigeration question, see the companion post: Do Capers Need to Be Refrigerated? For a complete pantry condiment reference, visit the Food Storage Guide.

    ⚡ Short Answer

    Yes, capers go bad — but they last a remarkably long time. Unopened brine-packed capers keep in the pantry for up to 2 years. Once opened and refrigerated, they stay good for up to a year. Salt-packed capers last up to 6 months at room temperature or up to 2 years refrigerated. Real spoilage means mushy texture, off smell, mold, or a bubbling brine. Slightly cloudy brine alone is not a spoilage sign.

    🤔 Why Capers Last So Long

    Capers are unripe flower buds from the caper bush, harvested before they bloom and preserved in one of two ways: packed in vinegar brine or buried in coarse salt. Both methods were developed specifically to extend shelf life, and both do it exceptionally well.

    Brine-packed capers sit in a solution of vinegar and salt. The vinegar creates an acidic environment (typically around pH 3 to 4) that makes it very difficult for harmful bacteria to survive. The salt pulls moisture out of any potential contaminants and further inhibits microbial growth. Together they form a preservation system that was used long before refrigeration existed. This is the same principle behind pickles, olives, and other brined foods.

    Salt-packed capers go a step further — no liquid at all, just dry salt surrounding the buds. The extreme salinity preserves them effectively at room temperature and gives them an even longer shelf life than brine-packed varieties, though they require thorough rinsing before use.

    💡 The key rule

    The brine is not just packing liquid — it is the preservation system. Capers that stay submerged in their brine will last significantly longer than capers that have been sitting above the brine line or stored without enough liquid. Keep them covered.

    🕓 Capers Shelf Life at a Glance

    Storage Situation How Long They Last
    Brine-packed, unopened — pantry Up to 2 years; often good past the best-by date
    Brine-packed, opened — refrigerated Up to 1 year; keep capers submerged in brine
    Salt-packed — room temperature Up to 6 months in a cool, dry spot
    Salt-packed — refrigerated Up to 2 years

    According to the USDA FSIS, best-by dates on shelf-stable products indicate peak quality rather than a safety cutoff. For capers stored properly and fully submerged in brine, usable life frequently extends well past the printed date.

    🔍 How to Tell If Capers Have Gone Bad

    Work through this checklist before adding capers to any dish. Start with the jar, then the brine, then the capers themselves.

    🔴 Toss Them

    Domed or bulging lid. Before you even open the jar — if the lid has developed a dome shape rather than sitting flat, or the safety seal has already popped, something has gone wrong inside. The seal failure means gas has built up from unwanted microbial activity. Do not open it. Discard the whole jar.

    No pop when opening a new jar. That audible pop when you crack a sealed jar is the vacuum releasing. If a brand-new jar opens without any resistance or sound, the seal was previously broken and the contents may have been compromised.

    Mold on the surface or capers. Any fuzzy growth — white, green, or black — inside the jar, on the brine surface, or on the capers themselves means the whole jar goes. Mold in a brined product indicates the acidic balance has been disrupted, usually from contamination or diluted brine.

    Mushy or slimy texture. Fresh capers are firm and slightly springy. If they collapse when you press them, feel slippery, or have lost all texture, they have deteriorated past the point of being usable.

    Off smell — not briny, but rotten or putrid. Capers in good condition smell sharp, vinegary, and briny. Spoiled capers smell wrong in a way that is immediately obvious — rotten, fermented beyond recognition, or putrid. Trust your nose.

    Brine is bubbling or heavily cloudy with sediment. Light haziness in the brine is normal. Active bubbling in a jar that is not freshly opened, or heavy cloudiness with visible floating particles, points to unwanted fermentation and possible spoilage.

    Brown or black capers. Fresh capers are dull olive green. Capers that have turned brown or black throughout have deteriorated past usable quality and should be discarded.

    🟢 Totally Normal — Keep Them

    Slightly cloudy brine. This is the most common reason people throw out perfectly good capers. A light haziness or slight cloudiness in the brine is completely normal, especially as the jar ages. It is not mold, not dangerous fermentation, and not a spoilage sign on its own. Check smell and texture. If both are fine, the capers are fine.

    Color has faded or paled slightly. Capers lose some of their bright green color over time in storage. Mild fading to a more muted olive or yellowish-green is a quality change, not a spoilage sign. Strong darkening to brown or black is a different matter.

    Slightly softer texture than fresh. Very old capers may lose a little of their firm bite. Mildly softer is a quality decline; mushy or slimy is spoilage. There is a clear difference between the two in practice.

    White salt deposits on the jar or lid. Dried salt crystallizing on the inside of the lid or around the rim is completely harmless — just salt residue from evaporation. Not mold, not a problem.

    ⚠ Running low on brine?

    Do not top up with plain water — that dilutes the acid and salt balance that keeps the capers preserved. If the brine level has dropped below the capers, top up with a mixture of equal parts white wine vinegar and water, or salted water using about one teaspoon of salt per cup of water. This keeps them submerged and maintains the preservation environment.

    ⚡ What Speeds Up Spoilage

    Capers sitting above the brine line. Any part of the caper exposed to air rather than submerged in brine is significantly more vulnerable to mold and drying. After each use, press the remaining capers down so they are covered and reseal the jar.

    Contaminated utensils. Dipping a wet spoon, a finger, or a utensil that has touched other food into the jar introduces bacteria and dilutes the brine. Always use a clean, dry spoon and shake it off before putting it back in the jar.

    Temperature fluctuations. Repeatedly moving capers between the fridge and room temperature (or a warm pantry) stresses the preservation system. Once opened, keep them consistently refrigerated.

    Diluted brine. Adding water to top up a low jar, or letting cooking liquid splash into it, weakens the acidity and salt concentration that keeps spoilage away. Use vinegar-based brine to top up, not plain water.

    🧊 Quick Storage Rules

    • Unopened jar: cool, dark pantry — away from the stove and out of direct sunlight. Shelf-stable for up to 2 years.
    • Opened jar: refrigerator — consistently cold, lid sealed tightly after every use.
    • Keep capers submerged in brine at all times. Press them down after each use.
    • Always use a clean, dry spoon — no double-dipping, no wet utensils.
    • Top up low brine with vinegar solution, not plain water.
    • Write the opening date on the lid — helps you track the one-year window after opening.

    🍽 Using Up That Open Jar

    Capers punch well above their size. A few ideas for keeping the jar moving:

    ❓ Frequently Asked Questions

    How can you tell if capers have gone bad?

    Check the jar first: a domed lid or missing pop on opening is an immediate discard. Then check the brine: heavy cloudiness with sediment or active bubbling points to spoilage. Then check the capers: mold, mushy texture, slimy feel, or a brown-black color means they are done. If everything looks and smells like sharp brine and the capers are firm and olive green, they are good.

    Is it safe to eat capers past their expiration date?

    Often yes, if the jar has been stored properly and shows no spoilage signs. The USDA FSIS confirms best-by dates reflect peak quality rather than a safety cutoff. Capers in good brine with a firm texture and clean briny smell are very likely still fine past the date.

    Why is the brine in my capers cloudy?

    Light cloudiness is completely normal and not a spoilage sign. It can develop from salt crystallizing, natural compounds leaching from the capers over time, or minor temperature changes. Check the smell and texture. If both are fine, the capers are fine. Heavy cloudiness with floating particles, an off smell, or active bubbling is a different matter.

    Can capers go bad in the fridge?

    Yes, eventually. Refrigeration significantly extends shelf life but does not preserve capers forever. Opened and refrigerated capers in brine stay at good quality for up to a year. The most common cause of refrigerated capers going bad is contamination from a wet or dirty utensil, or capers sitting above the brine line and drying out or developing mold.

    What is the difference between brine-packed and salt-packed capers?

    Brine-packed capers sit in a vinegar and salt solution and are the most common type in grocery stores. They are ready to use after a quick rinse. Salt-packed capers are buried in dry coarse salt with no liquid. They have a more intense, pure caper flavor and a firmer texture but require thorough rinsing before use to remove excess salt. Salt-packed capers last significantly longer — up to 2 years refrigerated versus 1 year for opened brine-packed.

    Do capers need to be refrigerated?

    Unopened brine-packed capers do not need refrigeration — they are shelf-stable in the pantry for up to 2 years. Once opened, refrigeration is strongly recommended. Full breakdown: Do Capers Need to Be Refrigerated?

    📚 Related Posts

    Sources: USDA FSIS — Food Product Dating | USDA FSIS — Shelf-Stable Food Safety

    The post Does Capers Go Bad? Everything You Need To Know. appeared first on Better Living.