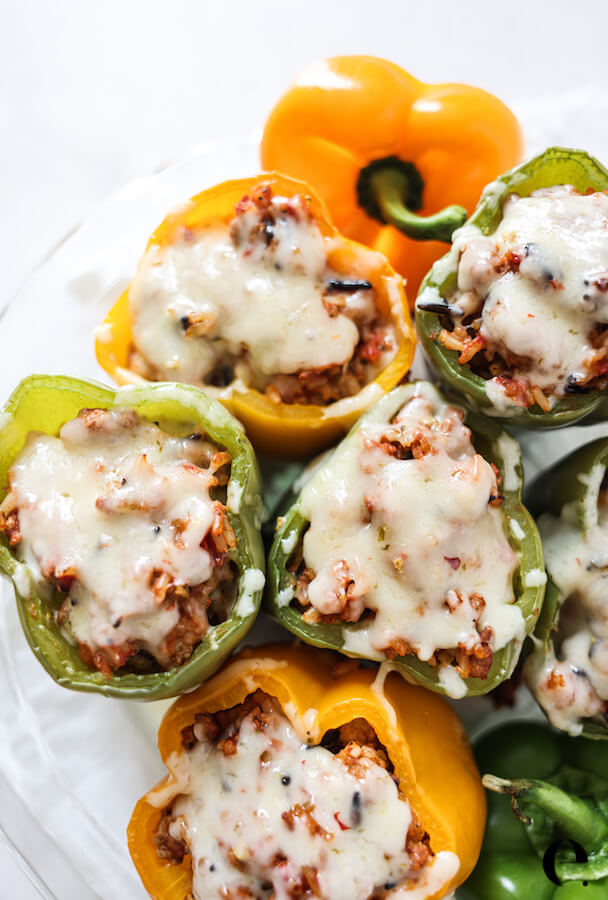

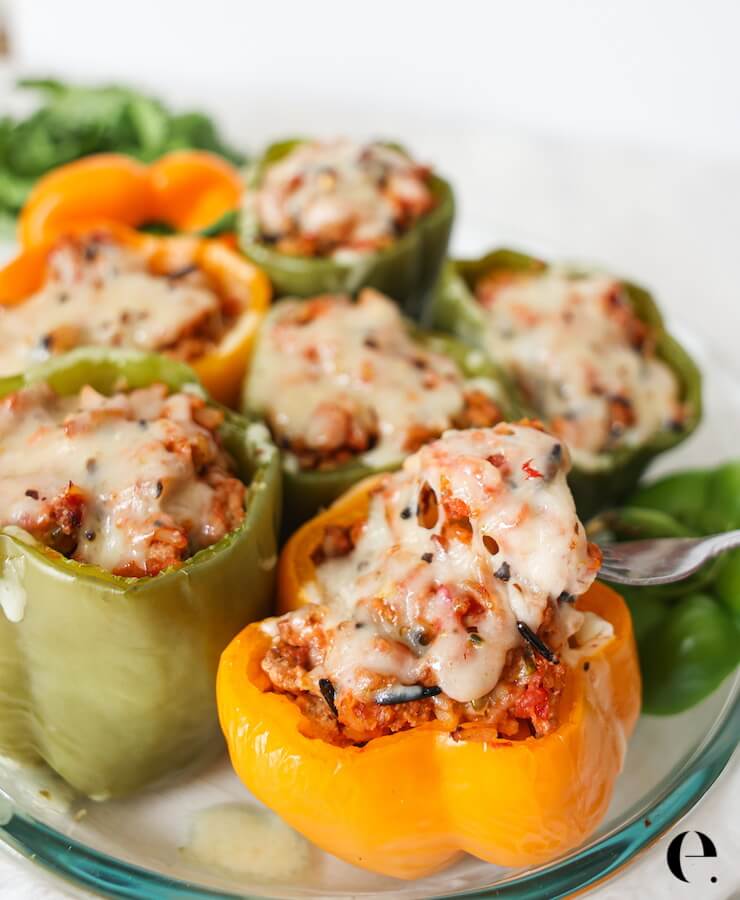
These Ground Turkey Stuffed Peppers are an easy, healthy dinner made with ground turkey, rice, crushed tomatoes, and melty cheese baked inside tender bell peppers. This family-friendly stuffed peppers recipe is ready in under an hour and perfect for meal prep or busy weeknights.
They’re cozy, satisfying, and endlessly customizable—one of those reliable dinners you’ll want on repeat.
Why You’ll Love This Recipe
- Easy, wholesome weeknight dinner
- Family-friendly (even for picky eaters)
- High in protein
- Customizable with what you have
- Great for leftovers and meal prep
Key Ingredients
- Bell Peppers: Use any colors you like. A mix of red, yellow, and orange makes this dish extra vibrant.
- Ground Turkey: Lean and mild. You can also use ground chicken or 90/10 lean ground beef.
- Rice: Brown rice is my go-to, but any cooked rice or quinoa works.
- Crushed Tomatoes: Adds moisture and holds the filling together. Look for a brand without added sugar.
- Onion & Garlic: The flavor base that makes everything taste better.
- Cheese: Pepper jack adds a little kick, but cheddar or mozzarella work great too.
- Spices: Salt, pepper, and optional taco seasoning for extra flavor. I recommend using the taco seasoning, but I ran out once and these turkey stuffed peppers were still great!
How to Make Turkey Stuffed Peppers (No-Boil Method)
- Prep the peppers: Preheat oven to 375°F. Cut the tops off the bell peppers and remove seeds and membranes. Arrange cut-side up in a lightly greased baking dish.
- Cook the turkey: Heat olive oil in a large skillet over medium heat. Add onion and cook 3–4 minutes until soft. Add garlic (and taco seasoning, if using) and cook 30 seconds. Add turkey and cook until browned, draining excess fat. Stir in crushed tomatoes, cooked rice, salt, and pepper. Mix in ½ cup cheese until melted.
- Assemble & bake: Spoon the turkey mixture into the peppers. Cover loosely with foil and bake for 30 minutes. Remove foil, sprinkle with remaining cheese, and bake 10–15 more minutes, until peppers are tender and cheese is melted. Garnish with fresh cilantro and serve.
Easy Variations
- Add more veggies: Stir in chopped spinach, mushrooms, zucchini, or corn to boost the veggie content and add more texture and flavor.
- Swap the protein: Use ground chicken, 90/10 lean ground beef, or a plant-based ground alternative instead of turkey.
- Make it Tex-Mex: Replace the crushed tomatoes with salsa, add black beans, and finish with jalapeños for a bold, Southwest-style twist.
- Make it grain-free: Swap the rice for cauliflower rice for a lighter option, or use black beans for a protein-rich, grain-free filling.
- Switch up the cheese: Cheddar, mozzarella, or a dairy-free shredded cheese all work well if you want a different flavor profile.
Stuffed Peppers Topping Ideas
- Avocado or guacamole
- Salsa
- Sour cream
- Fresh herbs
- Jalapeños or hot sauce
- A squeeze of lime
Storage
Store leftovers in an airtight container in the fridge for 2–3 days. Reheat in the oven or microwave.
Stuffed Peppers FAQ
Do I have to boil the peppers first?
No—this no-boil method gives better flavor and texture with fewer steps. If you prefer, you can parboil them for 5 minutes, then turn them upside down to drain. They will cook faster in the oven, but we skip this step for fewer dishes and cleanup. Cooking them a little longer in the oven is enough to get the peppers soft.
What should I serve with stuffed peppers?
A simple green salad or cilantro lime slaw pairs perfectly.
Are turkey stuffed peppers healthy?
Yes! They’re packed with lean protein, veggies, and whole grains.
More Healthy Mexican-Inspired Recipes
If you liked this stuffed pepper recipe, here are some more Mexican-inspired recipes to try next:
- The Best Sheet Pan Nachos
- Fiesta Quinoa Soup Recipe
- The Best Healthy 7-Layer Dip Recipe
- Healthy Slow Cooker Chicken Tacos
- Healthy Taco Salad Recipe
The post Ground Turkey Stuffed Peppers (Easy & Healthy!) appeared first on Elizabeth Rider – Modern Healthy Living.